From Buttons to Beams: The Evolution of the BMW Z4 Centre Console
If you’ve ever slid into the driver’s seat of a BMW Z4, you know the drill. Your eyes scan the dash, your hands find the wheel, and then… your gaze lands on the centre console. It’s the command center of the driving experience, and honestly, it tells the whole story of the Z4’s evolution.
Over the years, this space has transformed from a cockpit focused purely on analog driving to a high-tech hub of digital luxury. Whether you are restoring a classic E85 or eyeing a new G29, the centre console is where the magic (and sometimes the headaches) happen. Let’s take a deep dive into how this critical space changed over time.
The Early Days: E85/E86 (2002-2008) – The Driver’s Focus
In the first generation, the Z4 (E85/E86) was all about driving purity. The centre console was angled slightly toward the driver, emphasizing that this was a machine built for one purpose: driving. It was busy, filled with physical buttons for the HVAC system and stereo, giving it a robust, purposeful feel.
If you own one of these models and need to replace a worn piece, you might be looking for parts like the Genuine BMW Z4 Center Console Trim (Part # 51467055464) . This particular piece sits between the seats and features access doors for storage. It’s a testament to the era’s design—functional, durable, and finished in classic black.
The Hardtop Revolution: E89 (2009-2016) – The Style Shift
When the E89 generation arrived, it marked a significant shift. This was the first Z4 to feature a retractable hardtop , and the interior followed suit, moving toward a more premium, tech-focused aesthetic.
One of the most significant material innovations actually happened during this era. BMW became the world’s first automaker to use PP expandable-bead foam as a visible contour material in the centre console . In partnership with BASF, they used a material called Neopolen P.
- Weight Savings: It reduced the console weight by about 30% compared to previous solutions .
- Efficiency: The molding process consolidated production into a single step, integrating features like ventilation channels for the rear .
This generation also saw the introduction of iDrive controls nestled behind the shifter, marking the beginning of the shift away from the button-heavy dashes of the early 2000s.
The Modern Era: G29 (2018-Present) – The Tech Hub
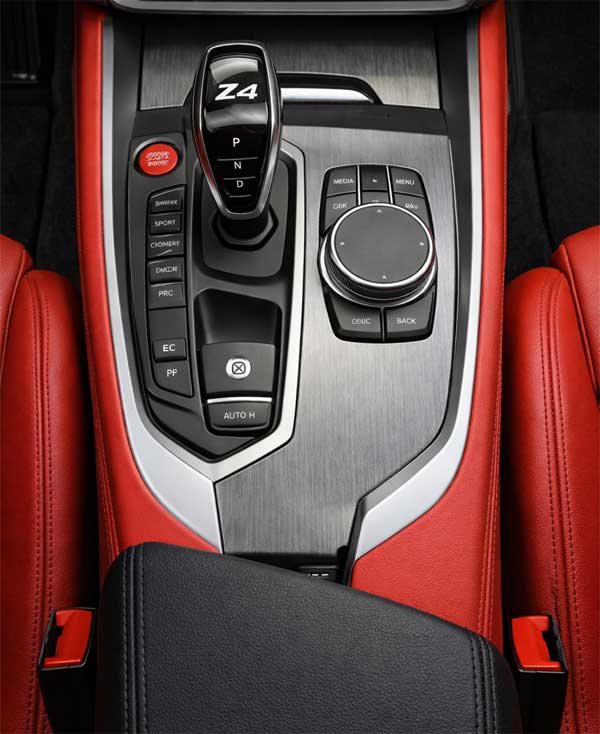
With the current G29 generation, BMW threw out the hardtop and went back to a soft top , but the interior went fully digital. The most obvious change? The centre console is now dominated by a massive, fully digital instrument cluster that merges into the iDrive screen, creating a seamless, tech-forward cockpit .
Here are the key updates that define the G29 console experience:
- Wireless Charging: A dedicated pad was added to eliminate cable clutter .
- Simplified Controls: While the climate control remains physical (for safety during blind operation), the number of buttons has been streamlined .
- New Hazards: However, modern tech comes with modern problems. A common issue with the G29 is a blacked-out center control screen. If this happens to you, mechanics often suggest checking the power supply or ribbon cable connections before assuming the screen is completely dead .
A Quick Comparison: How the Consoles Stack Up
To see how far we’ve come, check out this quick comparison of the three generations:
Conclusion
Whether you are a fan of the raw, button-heavy feel of the E85, the innovative weight-saving materials of the E89, or the high-tech digital suite of the G29, the BMW Z4 centre console perfectly encapsulates the spirit of its time. It has evolved from a simple interface for driving to a sophisticated digital cockpit.
And if you’re currently driving a G29? Be nice to that high-gloss black panel. As many owners have noted, deep scratches on the central cluster are a pain to fix—usually requiring a full replacement rather than a simple polish . But honestly, when that screen lights up and the road is calling, you probably won’t be looking at the scratches anyway.
Replacing Your BMW Z4 Mk2 Centre Console: A Complete Guide to a Fresh Interior
If you’re a BMW Z4 E89 owner, you know the drill. You slide into the driver’s seat, your hand rests on the gear shifter, and your eyes land on the centre console. And lately, that view hasn’t been pretty. Maybe the brushed aluminium finish is bubbling and cracking. Perhaps the buttons on your control panel have started peeling, revealing bare plastic underneath. Or maybe you’re just tired of the same old worn look and want to give your interior a fresh, updated feel.
Whatever your reason, replacing the centre console on the BMW Z4 Mk2 (E89, 2009-2016) is one of those DIY projects that looks intimidating but is actually achievable with some patience and the right guidance. I’ve dug through forums, tracked down part numbers, and pieced together the collective wisdom of Z4 owners who’ve been there, done that, and got the trim tool marks to prove it.
Let’s walk through everything you need to know about this upgrade.
Why Replace Your E89 Centre Console?
Before diving into the how-to, let’s talk about why this has become such a common project among E89 owners.
The most frequent culprit is the brushed aluminium finish that came on many Z4s. Over time, heat exposure and regular use cause the surface to bubble, crack, and lift . It’s not just unsightly—it can actually feel rough under your arm. One owner described finding that the finish was “cracking and lifting particularly on the centre console,” alongside scratches that showed up easily on the light-coloured surface .
Then there’s the control panel buttons issue. If you’ve noticed the icons on your roof operation buttons, seat heating switches, or other centre console controls fading or peeling away, you’re not alone. Forum discussions reveal this is a widespread problem across the E89 generation . A replacement switch cluster can run up to €240 from BMW, which has led many owners to explore creative solutions like sticker overlays or sourcing used units and refinishing them .
Pro tip: If you have the extended leather option in your Z4, be extra careful when working around the ignition key cover area. One owner warned that following standard instructions without accounting for this could result in a broken ignition key cover .
The Right Parts for Your Z4
Before you start dismantling anything, you need to know what you’re working with. BMW offered the E89 Z4 with multiple interior trim options, and the centre console parts vary depending on your car’s specification.
The centre console itself has different part numbers depending on the material and colour. According to the BMW parts catalog, here’s what you might need :
| Trim Material/Colour | Console Part Number | Matching Trim Panel Part Number |
|---|---|---|
| Alcantara/Leather Circuit/Black | 51169223710 | 51169181369 |
| Leather Nappa/Elfenbein-weiss | 51169181376 | 51169181371 |
| Leather Nappa/Sattelbraun | 51169322731 | 51169181369 |
| Leather Kansas/Black | 51169181374 | 51169181369 |
| Leather Kansas/Korallrot | 51169181377 | 51169181372 |
| Leather Kansas/Canberrabeige | 51169181375 | 51169181370 |
| Standard Plastic/Schwarz | 51169181493 | 51169181369 |
If you’re just swapping the trim pieces rather than the entire console assembly, you might find what you need on forums or specialist BMW parts sites. Just make sure to verify the part numbers match your specific model year and trim level.
Tools You’ll Need for the Job
Based on real-world experience from owners who’ve done this swap, here’s what you should have on hand :
- Trim removal tools (plastic pry tools—metal will damage your interior)
- Torx screwdrivers (T10, T20, and T30 sizes are common)
- Phillips head screwdriver (for the radio unit)
- Small flathead screwdriver (for releasing stubborn clips)
- Patience (this is the most important tool)
Step-by-Step: Removing the Centre Console
I’ve synthesised the most accurate instructions from multiple owner experiences. The key takeaway? Don’t believe everything you read online—some instructions for left-hand drive cars don’t apply to right-hand drive models .
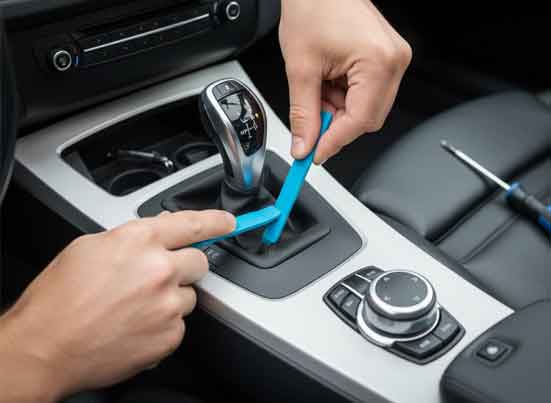
Step 1: Start with the Centre Console
Lift the armrest and use your trim tool to carefully pry up the gear gaiter surround. Once it’s loose, twist the gaiter trim so you can lift the console over the gear knob. This is a bit of a manoeuvre, but it’s doable.
Now pull up to unclip the centre console. There are connectors underneath—unplug them carefully. Each has a different securing clip, so take your time rather than forcing anything .
Step 2: Remove the Radio
Pop off the plastic cover plate below the radio. Behind it, you’ll find two Phillips screws holding the radio in place. Remove these and gently pull the radio out. Here’s the good news: you don’t need to disconnect the radio—just rest it to one side .
Step 3: Important Warning for RHD Owners
If you’re working on a right-hand drive E89, pay close attention. Many online guides tell you to remove the cover from the ignition/key socket because there’s a Torx screw behind it. Do not try this on RHD cars.
One owner who learned this the hard way explains: “On rhd cars there is no screw there and the front cover of the socket does not unclip from the front. It is fitted to the key reader and secured by two screws which cannot be accessed without taking off most of the metal dash mounting plate. There is no need to touch this socket to swap the dash trim” .
Step 4: Remove the Dash Trim
With the radio out, you’ll see two Torx screws above where the radio was. Open the glovebox—there are three more Torx screws in there. Use your trim tool to unclip the end cover, and then you can pull the dash trim off and unclip the connections .
Step 5: Swap the Components
Once the console is out, you’ll need to transfer components to your replacement piece. Most parts are held in with T10 screws, which come out easily. The roof control panel is an exception—it’s clipped in. Owners describe this as needing “three hands” and sometimes resorting to a knife to gently unclip it. It clips straight into the replacement piece without issue .
Alternative Approaches: Refinishing vs. Replacing
Not everyone wants to go through the full replacement process, and some parts are becoming harder to find. Here are alternatives that savvy owners have used:
Paint Refinishing: If you’re handy with a spray can, you can refinish your existing console. One owner removed their centre console and resprayed it with lacquer to achieve a piano black look . For buttons showing wear, SEM Trim Black paint (flat or satin depending on your preference) has been used successfully, though achieving the exact factory sheen requires careful selection of the finish .
Button Stickers: For worn switch icons, some owners have turned to replacement decals. A UK-based seller on eBay offers roof button decals specifically designed for the E89 control panel. Forum members report positive results with these as a budget-friendly alternative .
Used Parts: With patience, you can source used centre consoles and switch clusters from forums or eBay. One owner pieced together the best-condition buttons from multiple €20-33 used units, then refinished the housing with matte clear coat—ending up spending just 23% of what a new BMW part would cost .
Common Pitfalls to Avoid
Based on the collective experience of those who’ve done this before, here’s what can go wrong:
Not Reconnecting HVAC Properly: After reassembly, some owners have ended up with error codes because the HVAC controls weren’t fully seated. Double-check every connection before closing everything up .
Rushing with Trim Tools: It’s tempting to just pry harder when something doesn’t want to move. But these plastic clips break. Work slowly, use proper trim tools, and if something’s stuck, there’s probably a hidden screw you missed.
Assuming All Z4s Are the Same: As we’ve seen with the RHD ignition socket issue, not all instructions apply to all cars. Know your model, your year, and your drive configuration.
Ignoring the Smartphone Adapter: If your car has the factory smartphone integration, removing the cradle can be tricky. The adapter snaps in, and understanding how it releases—rather than forcing it—is key to avoiding damage .
The Final Verdict
Replacing the centre console on a BMW Z4 E89 is absolutely achievable for a dedicated DIYer. The job takes patience, the right tools, and a willingness to work through the quirks of your specific car. But the payoff is significant—a refreshed interior that makes every drive feel just a bit more special.
Whether you go with a full replacement, a refinishing job, or the sticker route for worn buttons, you’re joining a community of owners who’ve tackled this common E89 issue. And once it’s done? You can finally enjoy the view from the driver’s seat without that peeling, cracked, or dated centre console catching your eye.
Now if you’ll excuse me, I’ve got my own E89 centre console project to tackle—and I’m definitely remembering to leave that ignition socket alone.