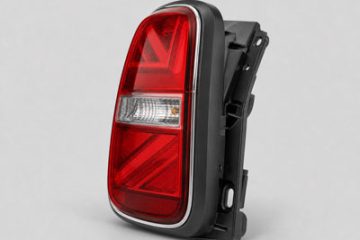
Mini Countryman Front Headlamp
Hey there, MINIac! Let’s talk about one of the most expressive parts of any MINI—those iconic front headlamps. On the MINI Countryman, they’re not just for lighting the road; they’re a signature part of the car’s personality and a showcase of some serious tech evolution. Whether you’re a proud owner looking to understand your ride better or just curious about the details, we’re shining a light on what makes these units special.

From Halogen to Matrix LED: The Tech Evolution
If you’ve browsed the used market or configured a new Countryman, you know headlamp options can be a maze. It’s a journey from simple illumination to intelligent lighting systems that literally see and react to the road.
The base models, especially in earlier generations (like the R60 and early F60), often came equipped with halogen reflector headlamps. Think of these as the dependable classic—functional but with that warmer, yellowish light. The part number for a typical halogen assembly for a pre-LCI F60 Countryman might be something like 63 12 9 357 936 (always verify with your VIN!). These lenses are usually made from durable polycarbonate plastic.
The game-changer came with the widespread adoption of LED units. Full-LED headlamps, often standard on higher trims like the Cooper S or John Cooper Works, offered whiter, brighter light, much better energy efficiency, and that crisp, modern look. MINI itself highlights the design importance, noting the headlamps frame the famous MINI grille and define the front-end character.
But the pinnacle of the tech is the Adaptive LED Headlights with Matrix High Beam (often part of a premium package). This isn’t just fancy wording. These systems use cameras and sensors to literally mask out portions of the high beam to avoid dazzling other drivers while keeping the rest of the road brilliantly lit. It’s like having a constant high beam on without being a jerk to oncoming traffic. The precision of these units is fantastic, often featuring intricate internal designs and dynamic turn signals.
Variants, Part Numbers & What to Look For
Navigating replacements or upgrades? You need to know your codes. The headlamp variant depends heavily on the model year, generation, and trim. For instance, a 2024 MINI Countryman JCW with Matrix LED will have a completely different (and more expensive) OEM number than a 2018 Countryman S with standard LED. A common part number for a later-model F60 LED headlamp (non-matrix) is 63 12 9 851 153, but again, VIN is king.
Manufacturers like HELLA and Marelli are known suppliers for MINI lighting components, employing advanced materials like scratch-resistant polycarbonate lenses and aluminum housings for heat dissipation from the LED arrays.
To make sense of the core differences at a glance, here’s a quick breakdown:
| Feature | Halogen Reflector | Full LED Headlights | Adaptive Matrix LED |
|---|---|---|---|
| Light Output | Warm, diffuse | Bright, white, focused | Intelligent, selectively dimming |
| Energy Use | Higher | Lower | Lower |
| Aesthetic | Classic, simple | Modern, crisp | High-tech, dynamic |
| Function | Basic illumination | Improved visibility | Camera-based adaptive beams |
| Typical Cost | Lowest | Medium | Highest |
The Real-World Implication: Why Your Choice Matters
So, beyond the specs, what does this mean for you? Your Countryman’s headlamps are a huge safety item. Upgrading from halogen to LED isn’t just a style move—it’s a visibility upgrade that can make night driving significantly less stressful.
For owners of older models, the aftermarket is tempting, but be cautious. Non-OEM units can have issues with beam pattern, moisture sealing, or even CAN-bus communication errors. When in doubt, sticking with OEM or high-quality certified parts from reputable suppliers is the way to go.
The dynamic here is clear: MINI has seamlessly blended a core design icon—the round headlamp—with cutting-edge technology. The lamps have evolved from a simple stylistic nod to the brand’s heritage into an active safety and driver-assistance feature.
Final Thoughts: The Windows to the Countryman’s Soul
Whether they’re the cheerful “eyes” of your halogen-equipped adventurer or the sharp, intelligent gaze of a Matrix LED-equipped JCW, the MINI Countryman front headlamp tells a story. It’s a story of where the car has been, what trim level it is, and how MINI balances timeless design with relentless innovation. Next time you unlock your car, take a second to appreciate those rings—they’re working harder and smarter than ever before.
Got a question about your specific Countryman’s lights? Always start by decoding your VIN or consulting a trusted parts diagram to ensure you get the perfect match for your unique MINI.
Headlight Hustle: Your Stress-Free Guide to Removing a Mini Countryman Headlight
Meta Description: Is your Mini Countryman headlight dim or damaged? Don’t panic! Our step-by-step guide, complete with tool tips and a crucial comparison, makes this DIY job feel like a breeze. Reclaim your shine and your savings.
Hey there, fellow Mini adventurer! So, you’ve noticed a flicker, a crack, or maybe just a serious case of the dulls from your Mini Countryman’s front end. Those iconic “eyes” of your car aren’t just for looks—they’re a critical safety feature. Before you mentally calculate the cost of a mechanic visit (spoiler: it’s steep for something this accessible), take a deep breath. Removing the front headlight on a Mini Countryman is a totally achievable DIY project.
I’ve been there, staring into the engine bay with a mix of determination and dread. But after digging through forums, official manuals, and a bit of trial and error, I’m here to tell you it’s more about patience and the right know-how than brute force. This guide will walk you through it, step-by-step, in a way that (hopefully) feels like a friend talking you through it in the driveway.
Why Bother? The “DIY vs. Dealer” Dilemma
Let’s cut to the chase. The main reason you’re here is likely one of two things: replacement or restoration. Maybe a rock from the highway left a starring crack, or perhaps condensation has turned your light into a fishbowl. Sometimes, it’s just for an upgrade to those slick LED units.
Taking this on yourself isn’t just about saving money—though you will, significantly. It’s about understanding your car. The Mini Countryman, especially models from the R60 generation onward, has a reputation for tight engine bays and “thoughtful” German engineering. As one detailed repair guide on NGEN Customs points out, accessing simple components often requires a specific sequence of steps. But that complexity is precisely what makes the reward sweeter.
I compared the common paths people take, and it breaks down like this:
| Aspect | DIY Approach | Professional Dealer/Mechanic |
|---|---|---|
| Cost | Primarily parts cost ($200-$800+ for the light itself). | Parts + 1-2 hours of labor ($150-$300/hr). |
| Time | 1-3 hours for a first-timer, depending on model year. | Usually under an hour for them. |
| Tools Needed | Basic set: screwdrivers, torx/hex bits, trim tools, socket set. | Their full professional kit. |
| Learning & Satisfaction | High. You gain knowledge and confidence. | None. You get a working car. |
| Risk Factor | Moderate (potential for broken clips, improper seal). | Low (they have seen it all before). |
| Warranty | On the part only, if purchased new. | Often on both the part and the labor. |
The implication is clear: if you have a Saturday afternoon, a modest toolkit, and a careful attitude, the DIY route empowers you and keeps cash in your pocket. But if the thought of touching a wiring harness makes you sweat, there’s no shame in the professional game.
Gearing Up: What You’ll Need Before You Start
Before we dive knuckle-deep, let’s get organized. Trust me, scrambling for a tool with a bumper half-off is a recipe for frustration.
Essential Tools:
- Trim Removal Tools: These plastic pry bars are non-negotiable. They prevent the heartbreak of scratched paint and broken plastic clips. A set is cheap and invaluable.
- Socket Set & Ratchet: You’ll need both metric sockets and likely some Torx bits (often T20 or T25). Minis love their Torx screws.
- Screwdrivers: Both flathead and Phillips, just to be safe.
- Gloves & Safety Glasses: Protect those hands from sharp edges and your eyes from falling debris.
The Part Itself:
Do you have your replacement headlight or restoration kit ready? Make sure it’s correct for your Countryman’s specific model year. A 2011 R60 and a 2017 F60 can have different fittings and connectors. Sites like RealOEM.com, which uses official BMW part diagrams, are a godsend for confirming part numbers before you buy.
Pro Tip: Work in a well-lit, flat area. And if you’re working on a modern Countryman with LED or adaptive headlights, it’s wise to disconnect the negative battery terminal before starting. This prevents any electrical shorts or error codes. A guide from Pelican Parts on BMW-related electrical work always emphasizes this safety-first step.
The Main Event: Step-by-Step Removal Guide
Alright, let’s get to it. This process generally applies to most first-generation (R60) and second-generation (F60) Countrymans, but always use your eyes—your car might have a slight variation.
Step 1: Access is Everything – The Grille & Bumper
For many Countrymans, you cannot simply pop the headlight out from the top. The front bumper cover often needs to be partially released. Don’t worry, you usually don’t have to remove it completely.
- Open the hood and locate the screws or bolts along the top edge of the grille/bumper.
- You may also need to remove the wheel arch liner clips on the side you’re working on. This is where your trim tools shine.
- Gently pull the bumper edge forward just enough to create a gap. Have a helper hold it, or use a soft wedge to keep it in place.
Step 2: Locate and Remove the Headlight Fasteners
Now, peer into the space you’ve created. You’ll typically see two or three bolts holding the headlight assembly to the radiator support frame. These are usually accessible from the top or the side. There’s also often a bolt or nut hidden down near the wheel arch area. Remove them all and place them in a safe container—they love to roll away.
Step 3: The Nerve-Wracking Part – Disconnecting the Wiring
This is the moment. Find the wiring harness connector at the back of the headlight. There’s usually a locking tab. Press it down firmly and pull the connector straight off. For bulbs like the turn signal or side marker that are part of the assembly, you may need to twist and release their separate sockets.
Step 4: Gentle Extraction
With all bolts out and wires free, the headlight is held in only by its guide pins and possibly some lower clips. Firmly but gently, wiggle and pull the assembly straight forward. Avoid prying against the body panels. It should come free.
And you’re done! Reverse the process to install your new or cleaned unit. When reconnecting the bumper, ensure all clips align before pressing them home. A satisfying ‘click’ is what you’re after.
Insights & Pitfalls: What the Manuals Don’t Always Say
Through my research and experience, a few universal truths emerged:
- Patience Over Power: German car plastic, especially when aged, can become brittle. If something isn’t budging, you’ve missed a bolt or a clip. Forcing it is the fastest way to a costly mistake.
- Seal the Deal: If you’re reinstalling an old light after cleaning out condensation, or installing a new one, the seal is critical. Ensure the rubber gasket is clean, pliable, and seated perfectly. A poor seal invites moisture back in immediately.
- The Adaptive Headlight Caveat: If your Countryman has adaptive headlights (they turn with the steering wheel), the process has an extra step. After reconnection, these systems often need to be recalibrated. Sometimes this can be done with a simple ignition cycle and turning the wheel lock-to-lock, but other times it requires a dealer-level diagnostic tool to reset the angle. It’s the biggest dynamic to consider on higher-trim models.
Shine On, Your Way
So, is removing a Mini Countryman headlight a dynamic task? Absolutely. It pits the satisfying, wallet-friendly empowerment of DIY against the precision (and cost) of professional service. But as you’ve seen, the process is less about arcane mechanical skill and more about methodical patience.