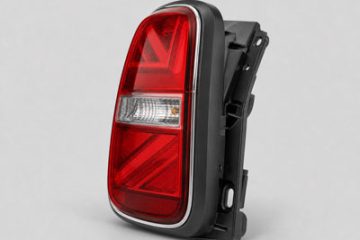
Ford Ka Headlamp

Ford Ka Headlamp
If you drive a Ford Ka, you know how crucial those little headlamp clusters are. They’re not just bulbs in a case; they’re a complex unit that defines the car’s face and, more importantly, your safety at night. Today, we’re diving into the world of the Ford Ka headlamp cluster—what makes it tick, how to tell them apart, and why choosing the right one matters more than you might think.
Spotting the Differences: Generations and Part Numbers
The Ford Ka, in its charmingly boxy first generation (1996-2008) and the curvier second generation (2008-2016), uses completely different headlamp units. It’s not a one-size-fits-all situation!
The first-gen Ka, especially post-2002 facelift models, typically uses a simple, glass-lensed reflector unit. A common OEM part number you’ll encounter for the right-hand (passenger side) unit is 1126424. These were often made with durable glass lenses and polycarbonate housings, which stood the test of time well, though the reflectors can degrade.
The second-gen Ka, which shares a platform with the Fiat 500, switched to a more modern, composite headlamp. These units frequently use plastic lenses and are designed for different bulb types. For example, a common part for a 2012 model might be something like 1S71-13006-AB. A key insight here is that the manufacturing moved towards more complex, modular units where replacing the entire cluster is often more sensible than trying to repair a damaged section.
To make this clearer, let’s break it down in a simple table:
| Feature | First Gen Ka (1996-2008) | Second Gen Ka (2008-2016) |
|---|---|---|
| Lens Material | Predominantly Glass | Predominantly Plastic |
| Typical Style | Separate indicator “pod” | Smoother, integrated look |
| Bulb Technology | Traditional Halogen (e.g., H4) | Often newer Halogen (e.g., H7) |
| Key OEM Example | 1126424 (RH Post-Facelift) | 1S71-13006-AB (Example) |
| Design Focus | Simplicity, durability | Style, aerodynamic integration |
The Big Implication: Why It All Matters
So, why does this generational split matter to you, the owner? Two words: safety and compatibility. A second-gen cluster won’t fit a first-gen car, period. But beyond that, the material choice has a huge impact. Those plastic lenses on the newer Kas are prone to hazing and oxidation from UV exposure, which can drastically reduce light output. The good news is they can often be restored with a good headlight restoration kit. The glass lenses on older models, while more resistant to fading, can suffer from pitting or internal reflector failure.
Furthermore, as noted by automotive lighting experts at PowerBulbs, the shift in bulb types between generations affects both light performance and replacement ease. Always check your owner’s manual for the correct bulb specification to avoid damaging the cluster’s electrical connectors.
When it’s time for a replacement, you face a dynamic choice: OEM (Original Equipment Manufacturer) versus aftermarket. A genuine Ford part, often made by companies like HELLA or Valeo, guarantees perfect fitment, correct beam pattern for MOT compliance, and long-term durability. Aftermarket options can be cheaper, but as many DIY mechanics report on forums like Ka-Cars.net, the fit can sometimes be less precise and the beam pattern may require adjustment to pass inspection. It’s a classic case of “you get what you pay for” for a critical safety component. You can buy cheap Ford Ka Headlamps, but they may not last as long or give out as much light.
Driving Conclusion
Your Ford Ka’s headlamp cluster is a perfect blend of form and function. Whether you’re restoring a classic first-gen or maintaining a peppy second-gen, understanding these units—from their part numbers to their plastic vs. glass debates—empowers you to make smarter, safer choices. Keep those lenses clear, whether by restoration or replacement with a quality unit, and you’ll ensure your little Ka continues to light up the road safely for miles to come. After all, seeing clearly is the first step to enjoying the drive.
Removing To Change Bulb
How To Replace Your Ford KA Headlamp Cluster
Is a cloudy Ford Ka Mk2 headlamp dimming your drive? Our hands-on, conversational guide walks you through the replacement, weighs DIY against pro help, and shares the one tool that makes all the difference.
Headlamp Hassle? Your Chill Guide to Replacing a Ford Ka Mk2 Headlight
Let’s be real, few things are more annoying on a drive than realizing your headlights have the illuminating power of a couple of tired glow-worms. If you’re the proud owner of a spunky Ford Ka Mk2 (2008-2016), you’ve probably noticed that over time, those once-bright headlamps can get cloudy, cracked, or just plain give up. The good news? Swapping out a Ford Ka Mk2 headlamp is a classic DIY job that can save you a decent chunk of change and give you a serious sense of accomplishment.
I’ve been there, fumbling in a half-lit driveway. So, I’ve done the research and the wrench-turning to break this down into a simple, conversational guide. We’ll talk tools, walk through the steps, and crucially, discuss whether this is a job for you or your friendly local mechanic. No jargon, no stress—just clear, relatable advice.
Gearing Up: What You’ll Need Before You Start
First rule of DIY club: be prepared. There’s nothing worse than getting the car half-apart only to realize you’re missing a crucial Torx bit. For the Ford Ka Mk2 headlamp replacement, you don’t need a garage full of pro tools, but a few items are essential.
You’ll need a set of screwdrivers (both flathead and Phillips), a socket set with extensions (usually 8mm and 10mm are key players), and a Torx T20 bit. The Torx is non-negotiable for the Mk2—those star-shaped screws aren’t going to budge for a regular driver. A trim removal tool or a flat, plastic pry tool is also a lifesaver for popping off clips without scarring your bumper. Oh, and some patience. Always pack the patience.
It’s also wise to check a reliable source for the exact bulb type if you’re replacing that too, as it can vary by model year. A quick peek at a site like PowerBulbs for their Ford Ka bulb finder can confirm whether you need an H4, H7, or another type. Getting the right part the first time is 90% of the battle.
Step-by-Step: The Replacement Dance
Okay, deep breath. The process isn’t complex, but it is a bit fiddly. We’re focusing on a full unit replacement here, which is often easier than trying to restore a severely clouded lens. Here’s the dance move breakdown:
Pop the Bonnet & Disconnect: Start with the car on a flat surface, engine cold, and the headlights switched off. Open the bonnet and locate the back of the headlight assembly. Disconnect the electrical connector by pressing the tab and pulling it straight back. Next, twist and remove the bulb holder if it’s part of the old unit.
The Bumper Tango (The Tricky Bit): This is the step that makes people nervous, but don’t panic. To access the lower headlight bolts, you need to partially release the front bumper. You don’t have to take it all the way off! Just loosen it. Start by removing the screws/bolts in the wheel arch liner (the plastic inside the wheel well). You’ll also find a few screws along the top of the bumper under the bonnet lip and usually a couple underneath the car. Euro Car Parts has a useful generic guide on bumper removal basics that highlights the common fastener locations, which are very similar on the Ka.
Gently Does It: Once all the fasteners are out, you need to gently pull the corner of the bumper away from the wing (the front fender). It’s held by plastic clips. Use your trim tool or your fingers to apply even pressure. You only need to create enough of a gap to get your hand and a socket in behind—think a few inches, not feet.
Unbolt the Old Unit: With access gained, you’ll see the headlamp is held by three or four bolts. These are usually a mix of Torx and 10mm bolts. Carefully remove them, keeping them safe. Support the headlight unit as you remove the last one.
Swap & Reverse: Gently maneuver the old headlamp out. Place your shiny new unit in position, hand-tighten all the bolts, then secure them properly. Reconnect the electrical plug and bulb holder. Now, carefully push the bumper clip back into place on the wing until it clicks. Reinstall all the screws and bolts you removed in the reverse order. Do a final check that everything is seated and tight.
Pro Tip: Do this job in daylight or in a well-lit garage. Trying to align a headlight in the dark is a special kind of frustration.
DIY vs. Pro: The Cost & Skill Comparison
This is the big question, right? Is it worth getting your hands dirty? Let’s break it down clearly. The dynamic here is all about trading time and confidence for money.
The DIY Route wins on cost. A new aftermarket headlamp unit can cost between £50 and £150, depending on brand and whether it’s a simple halogen or a fancier style. Your only other cost is time—about 1-2 hours for a first-timer. The implication is massive personal satisfaction and a deeper understanding of your car. However, the insight is that you must be comfortable with the bumper clip step. If the idea of prying plastic makes you squeamish, the risk of breaking a clip is real (though they are cheap to replace).
The Professional Route is all about convenience and guarantee. A mechanic will have this done in 30-45 minutes. The total cost, however, will typically double. You’re paying for their speed, expertise, and usually a warranty on the part and labour. As noted in a Haynes Manual overview, while their guides empower DIY, they always advise that if you’re not confident, there’s no shame in seeking a professional—it can prevent costly mistakes.
Here’s a quick table to visualize the trade-off:
Aspect DIY Replacement Professional Replacement
Part Cost £50 – £150 (you source) Often marked up (they source)
Labour Cost Your Time (Free) £50 – £100+ per hour
Total Estimated Cost £50 – £150 £150 – £300+
Time Investment 1-2 Hours (Learning Curve) 30-45 Minutes (Your Time Free)
Risk/Factor Risk of broken clips; need tools Guaranteed work; warranty
Best For Budget-conscious, hands-on owners Those valuing time/convenience
Key Insights & The One Tool That Changes Everything
Having done this job, the biggest insight isn’t about the bolts or the bumper—it’s about alignment. When you install a new headlight unit, you must check the beam alignment. A misaligned headlight is dangerous: it can dazzle other drivers and fail an MOT. This is a step even many DIY guides gloss over.
You can do a rough check by parking on level ground facing a wall or garage door and comparing the beam pattern and height to the other side. For a perfect job, most tyre and service centres will check and adjust alignment for a small fee (often around £25). It’s worth it.
And that one game-changing tool? It’s the trim removal tool. Using a screwdriver to pry plastic clips is a one-way ticket to cracked paint and snapped plastic. A £5 plastic trim tool spreads the force and makes the bumper step feel safe and controlled. It’s the best investment you’ll make for this job.
Conclusion: Light the Way Forward
Replacing a Ford Ka Mk2 headlamp is a quintessential intermediate DIY task. It demystifies your car’s front end, saves you money, and delivers that “heck yeah, I did that” feeling every time you turn on your bright, clear lights after dark.
Weigh the comparison table honestly against your own skill and comfort level. If the bumper step feels too big, there’s absolutely no failure in calling a pro. But if you’re armed with a Torx T20, a trim tool, and this guide, you’re more than equipped to tackle it.
Remember, the goal is a safer, brighter drive. However you get there, ensuring your Ka can see clearly is a job worth doing right. Now, go enjoy that like-new beam on the road ahead