Mini Countryman Rear Light Cluster: Everything You Need to Know
The rear light cluster on the Mini Countryman is one of those parts that does far more than just keep you legal on the road — it’s integral to how the car communicates with every driver around you, and when it goes wrong, the consequences range from annoying to genuinely dangerous. Whether you’re driving an older R60 or a newer F60, understanding what you’ve got back there is worth five minutes of anyone’s time.
What the Rear Light Cluster Actually Does
At its most basic, the rear light cluster is the entire tail-light assembly sitting at the back corner of the car — it houses your brake lights, tail lights, indicators, reversing light, and in most cases the rear fog light too, all in one moulded unit. For the average driver, it’s the thing you never think about until it fails, and when it does, you notice fast: a police officer pulls you over, your MOT tester marks a failure, or the driver behind you has no idea you’re braking.
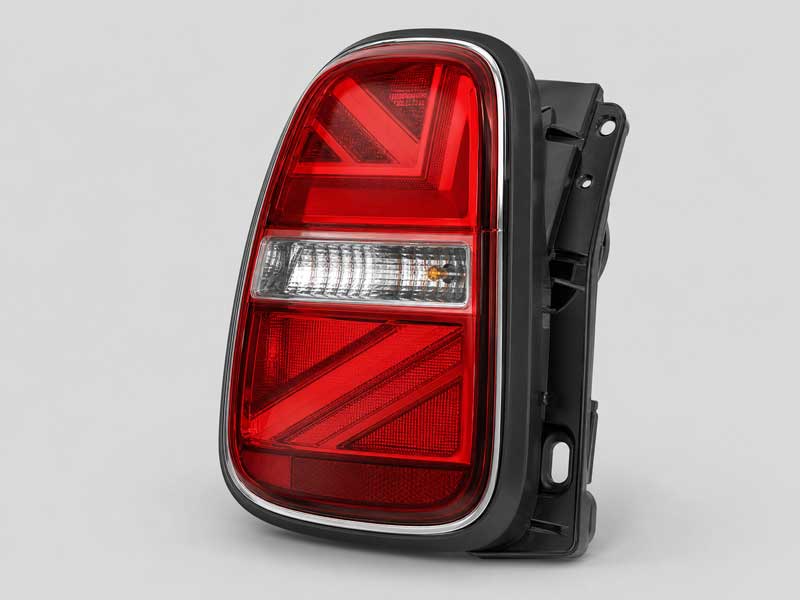
Beyond the legal angle, the cluster is a serious safety item. Brake lights that flicker intermittently — or worse, come on dimly and inconsistently — give the car behind you almost no warning. Indicators that flash at double speed (what the trade calls “hyperflashing”) are the cluster telling you one of the bulbs inside is gone. On the F60 generation with full LED units, things are slightly different because there are no individual bulbs to replace — the whole board is sealed, so if part of the LED array fails, you’re replacing the assembly.
[INSERT IMAGE: Mini Countryman F60 rear light cluster, nearside view]
Generation Differences: R60 vs F60
The Mini Countryman has run across two distinct generations, and the rear lighting technology between them is meaningfully different, not just cosmetically.
The R60 (2010–2016) used conventional halogen bulb technology across most variants. The cluster is a relatively traditional design with separate replaceable bulbs — brake, tail, indicator, reverse and fog — all accessible via the boot interior trim. The R60 Cooper S and John Cooper Works variants could come with chrome-effect trim surrounds, but fundamentally the lighting tech was the same across the range. Because individual bulbs are replaceable, a failed brake light on an R60 is genuinely a five-minute job.
The F60 (2017–present) is a different animal altogether. Standard models from launch came with halogen-based clusters, but from around mid-2018 onwards LED clusters became far more widely available — either as standard equipment on higher trims or as a factory option. The LED units are sealed assemblies with no user-serviceable bulbs inside. Mini also introduced the iconic Union Jack LED tail light design as an option on the F60, where the LED elements are arranged in a Union Flag pattern — a distinctive look that became enormously popular and is now available as a genuine retrofit kit from Mini themselves. The OEM retrofit part number for the F60 Union Jack LED tail lights is 63135A26BF0.
Critically, if your F60 was built with halogen clusters and you want to retrofit LED units — including the Union Jack style — you will need ECU coding to avoid a persistent fault light on the dash. The car’s body control module needs to know it’s now talking to LED loads rather than resistive bulb loads. More on that in Part 2.
Generation & Rear Light Cluster Overview
Common Failure Symptoms Beyond the Warning Light
The dashboard warning light is usually the last thing to flag a cluster problem, not the first. Before it trips, you’ll likely notice something subtler. On R60 models, the most common giveaway is a rapidly flashing indicator — that hyperflash tells you a bulb inside the cluster has blown. On the F60 LED variants, you’re more likely to see a section of the light bar go dark or display an uneven brightness pattern, because the LED strips are divided into zones.
Moisture ingress is another culprit that gets overlooked. If you see condensation inside the lens — a foggy, cloudy look when the lights are off — that’s water getting in through a failed seal, and it will eventually kill the electrics inside the unit. Physical cracks in the lens are particularly common on the F60 because the lenses are larger and more exposed, and a cracked lens is usually an MOT failure regardless of whether the light itself still works. Intermittent behaviour — a brake light that works sometimes but not others — often points to a failing connector or corroded earthy, both of which are worth checking before spending money on a new unit.
Part Numbers and What to Look for When Buying
For the R60, common aftermarket part references include JOHNS 2053881 (Cooper ALL4 variants) and the OEM number 20 53 88-1. Always cross-reference with your car’s exact engine code and build date — the R60 ran several engine variants and some clusters differ between them.
For the F60, the key OEM numbers to know are 63219477155 and 63217401725 (nearside/offside LED clusters for post-July 2018 cars with the extended LED scope option S5A4A). For the standard halogen F60 cluster, Autodoc lists aftermarket options starting from around £150 remanufactured. Genuine Mini OEM units from the official Mini Parts shop list at £261 each for Union Jack LED units.
When buying, you have three realistic routes: new OEM (most expensive but guaranteed fit and finish), remanufactured aftermarket (good middle ground — brands like OLSA and JOHNS are well-regarded in the trade), or used from a breaker (cheapest, but check the lens carefully for cracks and the connector pins for corrosion before parting with any cash). Avoid any listing that doesn’t clearly state whether the part is for a halogen or LED car, as they are not interchangeable.
Red flag most people miss: On the F60, always check whether the cluster is a LHD or RHD unit. Because Mini is a global brand, there are a lot of left-hand-drive parts floating around on eBay and Facebook Marketplace from European cars. The lens geometry and indicator position differ between markets. An LHD unit will physically fit an RHD car, but the light pattern will be wrong and it will likely fail an MOT beam check.
How to Remove the Rear Light Cluster on a Mini Countryman F60 (2017–2023)
This guide covers the second-generation Mini Countryman, chassis code F60, built from 2017 onwards. That’s the larger, more premium version of the Countryman that Mini launched in 2017 — don’t confuse it with the earlier R60. The removal procedure here applies to both the halogen and the LED cluster variants, because the mounting method is the same regardless of which lighting technology you’ve got. It works on all body variants: standard Cooper, Cooper S, Cooper SE, and John Cooper Works. Whether you’re nearside or offside, the process is identical — just mirror it.
[INSERT IMAGE: Mini Countryman F60 boot interior trim panel location]
The One Thing Most Guides Don’t Tell You: Coding May Be Needed
If you’re simply swapping a like-for-like unit — LED for LED, halogen for halogen — on the same car, you can skip this section. Job done, no coding required. But if you’re upgrading from halogen to LED (including the Union Jack retrofit), the car’s body control module will throw a fault almost immediately after you reconnect the battery. That’s because the BCM is calibrated to expect the higher electrical resistance of a halogen bulb. LED units draw far less current, which the BCM reads as a circuit fault — open circuit, in its language.
To clear this properly you need either a BMW/Mini-compatible diagnostic tool (ISTA, Carly, or BimmerCode will all work) to recode the relevant light outputs, or a trip to a Mini dealer or independent BMW specialist. It’s not a massive job — usually 30 minutes on a diagnostics session — but it’s the one thing most DIY guides completely ignore, and people end up driving around with a persistent warning light wondering what went wrong.
Phase 1: Removing the Rear Light Cluster
Before you start, you’ll need a T20 Torx driver (or a T20 bit on a ratchet), an 8mm socket and ratchet, a trim removal tool or a wide flat-bladed screwdriver with a rag over it to protect the paint, and a decent torch. The whole job should take you 20–30 minutes the first time, less once you’ve done it once.
- Open the tailgate fully. You need the boot open to access the interior side of the cluster. Make sure the car is switched off, keys out of the ignition.
- Locate and remove the interior trim access panel. Inside the boot, on the side corresponding to the cluster you’re removing, there’s a small square plastic panel in the boot lining — it’s near the corner, roughly level with the tail light. Pop it off by pulling it straight towards you; it’s held by plastic clips and comes away without tools. Set it aside somewhere safe.
- Push back the soundproofing/insulation. Behind that trim panel there’s a thick rubber foam insulation pad. Don’t try to remove it completely — just push it inwards and out of the way to expose the back of the light cluster. It’s a tight space but it folds back enough to give you access.
- Disconnect the bulb holder / release the locking clip. You’ll see the back of the cluster now. On halogen units, there’s a circular bulb holder with a locking clip in the centre — press the clip and twist the holder anti-clockwise to remove it. On LED units there’s a wiring loom connector with a press-release tab. Press the tab firmly and pull the connector straight off. Don’t yank at the wires — press the tab first.
- Locate the two white plastic quarter-turn retainers. Looking into the back of the cluster recess, you’ll see two white plastic thumb-turn fasteners. These are the main retaining mechanisms that actually hold the cluster body against the car’s bodywork. Turn them both 90 degrees anti-clockwise — they’ll loosen off and sit proud of the surface. You do not need to remove them completely; just turn them until they’re loose.
- Undo the two 8mm bolts/U-nuts at the outer edge. On the exterior of the car at the seam between the cluster and the rear bodywork, there are two small 8mm U-nuts (sometimes described as speed nuts) that are also part of the mounting arrangement. Use your 8mm socket to remove these — they’re usually very accessible.
- Pull the cluster assembly away from the body. With the retainers turned and the 8mm fasteners out, the cluster should pull straight out away from the car. Be firm but controlled — there are locating pins on the cluster that sit in rubber grommets in the body, and they need a straight pull to release cleanly. Don’t twist or lever. If it feels very stuck, double-check the retainers are fully released before applying more force.
- Check the gasket seal. Before you fully pull the unit clear, have a look at the foam rubber gasket around the back edge of the cluster housing. On older cars this seal can stick to the bodywork. If it’s stuck, peel it away carefully — you don’t want it to tear, as a damaged seal is the primary cause of water ingress into the light cavity.
Torque Specifications
| Component | Fastener Size | Torque (Nm) |
|---|---|---|
| Quarter-turn plastic retainers | Hand-tight (quarter turn) | N/A — finger tight only |
| 8mm U-nut outer fasteners | 8mm | 8–10 Nm |
| Bulb holder locking ring (R60/halogen F60) | N/A | Hand-tight, quarter turn to lock |
There are no high-torque fasteners on this job. If you’re reaching for a torque wrench for the 8mm U-nuts, a gentle snug is all you need — these are plastic-backed fixings and you will crack the housing if you over-tighten them.
Phase 2: Fitting the Replacement Cluster
Refitting is broadly the reverse of removal, but there are a couple of things worth calling out specifically that trips people up.
First, offer the new cluster up to the aperture and align the locating pins before pushing it home. The pins need to drop into their grommets squarely — if you push with the unit at an angle, the pins won’t seat properly and the cluster will sit slightly proud of the bodywork on one edge. Take a moment to get it aligned first, then push it straight in with both hands until it feels seated.
Second, the two white quarter-turn retainers need to be turned clockwise back to the locked position before you reconnect the electrics. It’s easy to plug everything back in and forget to do this, especially if you’re working in a tight boot space. If the retainers aren’t locked, the cluster can work loose over time and the seal will fail.
Reconnect the wiring connector firmly — you should hear or feel a distinct click as it locks home. On halogen units, reinsert the bulb holder and give it a clockwise quarter-turn to lock. Refit the 8mm U-nuts finger-tight first, then snug them down to around 8–10 Nm. Push the soundproofing back into position and clip the interior trim panel back on.
Before you close the tailgate, test everything: brake lights (get someone to press the pedal or use a brick), indicators left and right, reversing light, rear fog light, and tail lights. It takes thirty seconds and saves you having to pull it all apart again if you’ve got a stray connector that didn’t seat properly.
If you fitted LED clusters onto a car that previously had halogens, now is when you connect your coding tool and recode the body module. Do this before driving the car — don’t assume you’ll do it later and forget.
Is It Worth Doing Yourself?
Honestly, yes — this is one of the more approachable jobs on the F60 Countryman. The biggest cost saving comes down to labour: a typical independent Mini specialist will charge between one and two hours of labour for this job (say £80–£160 depending on your area), on top of the parts cost. If you buy a decent quality aftermarket LED unit at around £150–£160 and fit it yourself, you’re looking at roughly £150–£170 all-in versus £350–£450 at a garage using OEM parts.
The one scenario where you might want professional help is if you need coding for an LED retrofit and you don’t have access to a compatible diagnostic tool. BimmerCode on a smartphone and a compatible Bluetooth OBD2 adapter costs around £30–£40 in total and does the job perfectly well — so even that hurdle is a low one if you’re even mildly comfortable with technology.
Used clusters from a reputable breaker (check PartsGateway or GlobalParts) typically come in at £60–£100 each and are worth considering if your car is getting on a bit and you don’t want to spend big on it. Just inspect the lens, check the connector, and make sure you’re getting the right variant — halogen or LED — for your car.
Difficulty Rating
3 out of 5 spanners — the cluster itself comes out easily enough, but the tight access inside the boot, the risk of cracking plastic clips if you’re heavy-handed, and the potential coding requirement if you’re swapping tech types mean this isn’t quite a two-minute job for the uninitiated. Take your time, work clean, and it’s well within the reach of any competent home mechanic.