Ford Focus Headlamps: Lighting the Way Through Every Generation
Let’s talk about something we often take for granted until it’s too late: your Ford Focus headlamps. Whether you’re facing a failed bulb, a foggy lens, or just want a modern upgrade, understanding your options can save you money and massively improve nighttime driving. Having spent hours digging into parts catalogs and repair forums, I’m here to guide you through the dynamic world of Focus lighting.

From Halogen to LED: A Bright Evolution
The Ford Focus, over its long production run, has seen a dramatic shift in headlamp technology. This isn’t just about brightness; it’s about safety, style, and sometimes, a bit of DIY-friendly complexity.
For most of its life, especially in lower trim levels, the Focus used reliable halogen reflector headlamps. Think of these as the dependable workhorses. They use replaceable bulbs (like the common H7 for low beams on many models) and are relatively inexpensive to fix. A burnt-out bulb? You can often swap it yourself in minutes.
The game changed with the introduction of projector housings and High-Intensity Discharge (HID) or LED systems, particularly on higher-end Titanium or ST-Line trims. Projectors provide a sharper, more controlled light cutoff, while HIDs and LEDs offer significantly brighter, whiter light. However, they’re usually integrated into the assembly. If an LED module fails on a newer model, you’re often looking at replacing the entire unit—a much costlier proposition.
Here’s a quick comparison of the main types you’ll encounter:
| Feature | Halogen (Reflector) | Halogen/ HID (Projector) | Full LED |
|---|---|---|---|
| Typical Models/Years | Base S/SE trims, pre-2012 models | Higher trims (Titanium, ST), 2012+ facelifts | Focus ST, Focus Active, 2018+ refresh |
| Brightness & Color | Warm yellow-white, moderate output | Whiter, brighter beam (especially HID) | Crisp, bright white, daylight-like |
| Replacement Complexity | Simple bulb swap (e.g., H7, 9005) | Bulb swap possible, but housing is projector | Usually requires full assembly replacement |
| Cost to Repair | Low (bulb cost only) | Moderate (HID bulbs/ballasts can be pricey) | High (sealed LED module in full unit) |
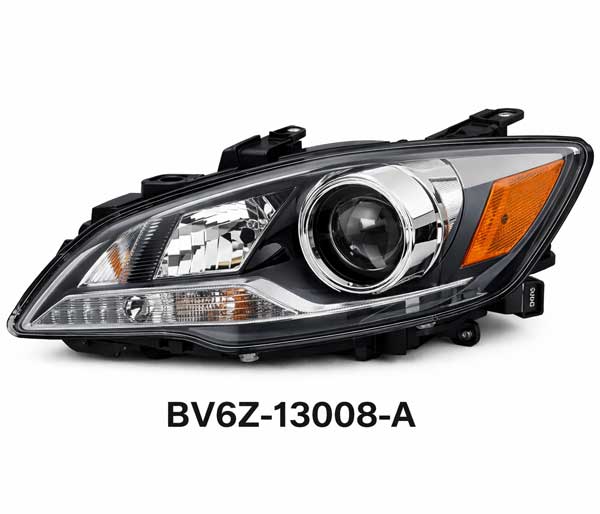
| OEM Part Example | BV6Z-13008-A (Left, Halogen, 2012-2014) | G1EZ-13005-C (Left, w/ HID, 2015-2018) | JX7Z-13005-B (Left, Full LED, 2018+) |
Note: OEM part numbers are examples; always confirm with your VIN.
What It Means for You
The move towards integrated LED lighting, as noted in automotive repair analyses, represents a trade-off. You get superior longevity, energy efficiency, and performance, but at the cost of modular repairability. This shift means checking your specific headlamp type is more important than ever before ordering parts.
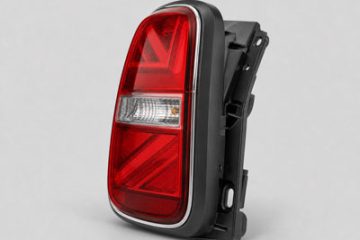
Another critical point is material degradation. Early Focus models (think Mk1 and Mk2) often used polycarbonate lenses that are prone to UV yellowing and hazing. This isn’t just cosmetic; it can drastically reduce light output. While restoration kits can work wonders, severe cases might justify hunting for a clean used assembly from a reliable source like Ford Parts or a reputable salvage network.
For the DIYers, upgrading from halogen to OEM projectors or LEDs is tempting but notoriously tricky. It often involves more than just swapping assemblies—think wiring harness adapters, potential Forscan software configuration to tell the car’s body control module about its new eyes, and aiming adjustments. It’s doable, but requires research.
The Road Ahead: Shine Brighter
So, what’s the takeaway? Your Ford Focus headlamp journey is a direct reflection of your car’s age and trim. Knowing what you have is half the battle. Before you buy anything, pop the hood, check for labels on the assembly, or better yet, run your VIN through a dealer parts portal.
Whether you’re performing a simple bulb refresh, battling lens haze, or contemplating a major upgrade, investing in your Focus’s lighting is an investment in safety. A clear, bright path ahead makes every drive more confident. Now, go see what’s lighting up your front end!
Your Mk3 Ford Focus Headlight Swap: A Straightforward DIY How To Guide
So, your trusty Mk3 Ford Focus (that’s the 2011 to 2018 model for most of the world) has a headlight that’s seen better days. Maybe it’s foggy beyond repair, cracked from a rogue stone, or just has an electrical gremlin. The dealership quote made your eyes water, and you’re wondering if this is a job you can tackle in your own garage or driveway.
Good news: It absolutely is. Swapping the front headlight assembly on a Mk3 Focus is one of those perfect intermediate DIY projects. It requires patience more than expert skill, and the payoff in savings and satisfaction is huge. This guide is your co-pilot, walking you through replacing both the Left-Hand (LH) and Right-Hand (RH) headlamp assemblies. We’ll highlight the sneaky differences between the sides, arm you with crucial insights, and turn a daunting task into a manageable Saturday afternoon mission.
Before You Turn a Single Bolt: Crucial Prep and Parts
Let’s avoid the biggest pitfall right from the start: buying the wrong part. The Mk3 Focus came with several headlight types, and they are not all compatible.
- Halogen vs. HID vs. LED: Most base models use standard halogen bulbs in a reflector housing. Higher trims (like Titanium, ST-Line, or the sporty Focus ST) often have factory High-Intensity Discharge (HID) or full LED units. These systems have different plugs, ballasts, and projectors.
- The Definitive Check: Don’t guess. The safest methods are:
- Check the Old Unit: Remove the headlight (we’ll get to that) and look for a stamped part number on the housing.
- Use Your VIN: Input your Vehicle Identification Number into a trusted Ford OEM parts catalog. This will tell you the exact factory specification.
- Common Part Numbers (Examples – ALWAYS verify):
- Halogen Headlamp, LH: BM5Z-13008-A
- Halogen Headlamp, RH: BM5Z-13008-B
- HID Headlamp, LH: CM5Z-13005-A
- Gather Your Tools: You’ll need a 10mm socket with ratchet and extension, a Phillips screwdriver, a trim removal tool (or a set of plastic pry tools—these are lifesavers for preventing scratches), and a flashlight. A blanket or mat to kneel on is a nice bonus.
Safety First! Before any work, disconnect the negative terminal of your car’s battery. This simple step prevents any risk of electrical shorts or accidental airbag issues while working near the front end.
The Access Game: Bumper Removal vs. Wheel Well Method
Here’s where the Mk3 differs from some cars and where you have a choice. The headlight is held in by bolts you can’t easily see. You have two main paths:
- The “Full Access” Method (Bumper Removal): This involves partially removing the front bumper cover. It sounds scary but is often the easier method for a complete beginner because it gives you clear, unobstructed access to every bolt and connector. This is the method we’ll detail below, as it’s the most thorough and least frustrating.
- The “Nimble Fingers” Method (Wheel Liner Access): This involves removing the front wheel and the inner wheel arch liner to reach the bolts from the side. It can be faster if you’re experienced, but working in the tight, dirty wheel well can be a hassle, especially on the side with the washer fluid reservoir.
For a stress-free first time, I strongly recommend the bumper method. Let’s break it down.
Step 1: Partially Releasing the Front Bumper
Don’t worry, you’re not taking the whole bumper off—just loosening the top and sides enough to peel it forward a few inches.
- Pop the Hood & Top Clips: Open your hood fully. Along the top edge of the radiator support, behind the grille, you’ll see a series of plastic push-pin clips. Use your trim tool to pry the center pin up on each, then remove the entire clip.
- Wheel Arch Screws: Turn your front wheels fully away from the side you’re working on first. In the front of the wheel arch, you’ll find several Phillips screws and possibly more push-pins securing the bumper to the fender liner. Remove these.
- The Critical Side Bolts: Now, peer into the gap you’ve created in the wheel arch. You should see one or two 10mm bolts securing the bumper’s side bracket to the fender. Remove these. Repeat this on the opposite side of the car.
- Gently Pull Forward: With all fasteners removed, the bumper cover is held only by clips along its top edge and guides underneath. Starting at one corner, gently but firmly pull the top edge of the bumper cover straight forward until it disengages from the clips. Have a helper support it, or use some tape to hold it forward. You only need about 4-6 inches of space.
Congratulations! The headlight assembly is now visible, with its bolts staring right at you.
Headlight Removal & The Side-by-Side Reality
With the bumper peeled back, the three 10mm bolts holding the headlight are easy to spot: one on top, one near the grille, and one in the fender area. But here’s the dynamic no one talks about enough: the LH (driver side) and RH (passenger side) are not created equal in the Mk3.
The main villain? The washer fluid reservoir. It’s positioned directly behind the driver-side headlight, cramping your style.
| Aspect | LH (Driver Side) Headlight | RH (Passenger Side) Headlight |
|---|---|---|
| Primary Obstacle | Washer fluid reservoir severely limits hand and tool space. | Clear, mostly unobstructed access. The easiest side by far. |
| Key Strategy | You will likely need to loosen the reservoir mounting bolt and gently push the tank toward the engine for clearance. No need to disconnect hoses. | A straightforward removal. No major obstacles. |
| Electrical Connections | One large multi-pin connector for the main harness. There may be a separate, smaller connector for the side marker/parking light. | Identical connector setup. Always note how they are oriented before disconnecting. |
| Bulb Access Point | Bulb access for replacement is notoriously tight on this side, often requiring removal of the air intake duct or reservoir for simple bulb changes. | Much easier to reach bulbs from the engine bay without removing the assembly. |
The Universal Removal Steps:
- Unplug with Care: Find the main electrical connector on the back of the assembly. Press the locking tab firmly and pull it straight off. If there’s a second, smaller connector, do the same.
- Remove the Three Bolts: Using your 10mm socket, remove all three mounting bolts. Keep them safe.
- Extract the Assembly: The headlight is now free. Pull it straight forward off its locating pins. It might need a gentle wiggle. Set the old unit aside.
- Install in Reverse: Position the brand-new assembly onto the locating pins. Hand-start all three bolts to ensure everything is aligned, then snug them down with your socket. Avoid over-tightening! You’re securing plastic to metal.
- Reconnect: Plug all electrical connectors back in until they click. A good practice is to temporarily reconnect the battery and test the lights (parking, low beam, high beam, turn signal) before buttoning everything up.
The LH Side Pro-Tip: Before you even try to unplug the connector on the driver side, address the reservoir. Find its single 10mm mounting bolt (usually on a bracket near the top), loosen it, and carefully maneuver the whole tank a few inches toward the engine block. This small act transforms an impossible finger-cramping exercise into a simple task.
The Non-Negotiable Finale: Aligning Your Headlights
You’ve installed the new unit, refastened the bumper, and reconnected the battery. You’re done, right? Not quite. A newly installed headlight assembly is almost never aimed correctly.
Driving with misaligned headlights is a major safety issue. You’ll blind oncoming traffic or, worse, fail to see the road ahead of you. Aiming them is easy and essential.
How to Aim Your Mk3 Focus Headlights (The Driveway Method):
- Prep Your Space: Park your Focus on level ground, facing a wall or garage door, about 10-15 feet away. Have the car’s normal weight in it (full fuel tank, no extra cargo).
- Create Reference Points: Measure from the ground to the center of your headlight lens. Mark this height on the wall with a horizontal strip of painter’s tape. Do this for both sides.
- Locate the Adjustment Screws: On the back/top of the headlight assembly, you’ll find two white plastic adjustment screws. One controls the up/down (vertical) aim; the other controls left/right (horizontal) aim. You can use a Phillips screwdriver or a long 8mm socket for these.
- Adjust on the Wall: Turn on your low beams. Cover the opposite headlight so you can see the pattern of the one you’re adjusting. The clear, sharp cutoff line of the beam pattern should land at or just below the horizontal tape line on the wall.
- Fine-Tune: Turn the adjustment screws in small increments. Clockwise usually raises the beam or moves it right; counterclockwise lowers or moves it left. The goal is a perfectly level cutoff that doesn’t glare into other drivers’ eyes.
For the most precise factory-level alignment, especially critical for the focused beam of HID projectors, consulting the official vehicle service manual for the exact procedure and measurement distances is recommended.
The Bigger Picture: What You’ve Really Achieved
The key insight from the Mk3 Focus is its clever, modular design. While tight in places, it is built to be serviced. The challenge of the washer fluid reservoir isn’t a flaw; it’s a puzzle with a simple solution, teaching you to work smarter, not just harder.