Ford Focus Timing Belt
If you own a Ford Focus, there’s a high-tensile rubber belt under the hood that’s arguably the most important piece of maintenance you’ll ever deal with. The Ford Focus timing belt is the silent conductor of your engine’s symphony, and ignoring it is a gamble no owner should take. But with so much conflicting advice online—”Is it interference?” “What’s the real interval?”—it’s easy to feel lost.

Let’s clear the air and get you the straight facts, so you can drive with confidence.
The Crucial Divide: Belt vs. Chain and Why It Matters
First, you need to know what you have. The Focus has used both timing belts and timing chains across its generations, and the service implications are huge.
- Timing Belts: These are reinforced rubber belts with teeth, designed to be replaced at set intervals. They are generally quieter but have a finite lifespan.
- Timing Chains: These are metal chains designed to last the lifetime of the engine. They rarely need planned replacement but can be noisier and, if neglected, can suffer from tensioner failure.
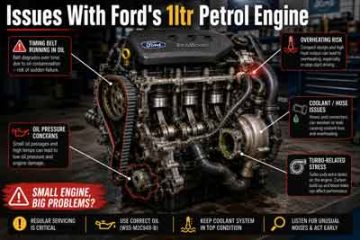
For most Focus owners asking about replacement, the concern lies with the belt-driven engines. The most common of these is the 1.0L EcoBoost (Fox) engine found in models from 2012 onward. Despite its small size, this award-winning engine is precisely why this topic is critical. Ford’s official guidance for this engine states the timing belt is designed to last the lifetime of the engine but should be inspected at 150,000 miles or 10 years. This has caused significant debate in the automotive community.
Why the fuss? This isn’t a standard belt. It’s a wet belt, meaning it runs in an oil bath to reduce noise. While innovative, this design introduces new considerations. Contamination from fuel dilution or degraded oil can weaken the belt material. For this reason, many independent specialists and technicians, including those contributing to in-depth forums on Focus Fanatics, recommend a more conservative replacement interval of around 150,000 miles, regardless of age, due to the potential for oil-related degradation.
The “Interference” Question: The Stakes of Failure
This is the heart of the issue. An interference engine is one where the pistons and valves occupy the same space in the cylinder, but at different times. The timing belt is the only thing preventing them from colliding.
For the 1.0L EcoBoost, the answer is yes, it is an interference engine. If the timing belt snaps or jumps, the pistons and valves will collide, causing catastrophic engine damage. The repair cost often exceeds the value of the car. This single fact transforms the timing belt from a service item into a critical safeguard.
Other older Focus engines, like the 1.6L and 2.0L Duratec units found in the second and third generations (2004-2011), are typically non-interference. A snapped belt will stall the car and leave you stranded, but it usually won’t cause internal engine destruction. However, the tow bill and repair are still costly and inconvenient.
Navigating the Replacement Maze: What You Need to Know
Replacing a Focus timing belt, especially on the 1.0L EcoBoost, is not a simple job. It’s a system replacement.
Key Parts & The “While You’re In There” Rule:
For the 1.0L EcoBoost, the timing belt kit is often sold under part number G1DA-6K254-AA (kit may vary). This should include the belt, tensioner, and idler rollers. Crucially, due to the wet belt design, the job also requires:
- A new oil pump drive belt (a smaller belt that drives the oil pump).
- New engine oil and a filter.
- New coolant.
The labour is extensive, as noted in technical service bulletins, requiring special tools and several hours of work. This is not a cheap service, but it’s a fraction of the cost of a new engine.
To summarize the core differences:
| Aspect | 1.0L EcoBoost (Wet Belt) | Older 1.6L/2.0L Duratec (Dry Belt) |
|---|---|---|
| Engine Type | Interference | Typically Non-Interference |
| Key Material Fact | Belt runs in engine oil | Belt runs dry, externally |
| Official Guidance | “Lifetime” – Inspect at 150k mi/10 yrs | Replace approx. every 100k-125k miles |
| Common Advice | Replace at ~150k mi due to oil degradation | Replace at interval or 10 years |
| Failure Consequence | Catastrophic engine destruction | Engine stall, stranded, no internal damage |
The Final Verdict: Proactivity is Power
The dynamic with the Ford Focus timing belt is one of risk management. Trusting a “lifetime” belt in an interference engine is a high-stakes bet. The insight from the community and careful mechanics is clear: proactive replacement based on a conservative mileage interval is the only way to guarantee reliability.
For 1.0L EcoBoost owners, plan for that major service as you approach 150,000 miles. For owners of older models, adhere to the distance or time interval (whichever comes first). Use quality OEM or OE-equivalent kits from brands like Gates or Continental.
In the end, this service isn’t an expense—it’s an investment in the longevity of your Focus. It replaces uncertainty with peace of mind, ensuring the heartbeat of your car remains strong for miles to come. Don’t wait for the snap; take control of the schedule.

How To Replace The Timing Belt ON A Mk3 Ford Focus: A DIYer’s Deep Dive
Alright, let’s have a proper chat about one of the most significant jobs you can tackle on a Mk3 Ford Focus: replacing the timing belt. If you’re here, you probably already know this isn’t a simple oil change. It’s a critical, precision task that sits right at the intersection of “sensible maintenance” and “potential engine disaster.” But with the right preparation, knowledge, and a healthy dose of respect for the process, it’s an achievable project for a competent DIY mechanic.
I’m not going to sugarcoat it—this is an intermediate to advanced job. However, by walking through it step-by-step, understanding the why behind each step, and knowing exactly what you’re getting into, you can save a substantial amount of money and gain immense satisfaction. Grab a brew, get comfortable, and let’s demystify the process of replacing the timing belt on your Focus.
Why This Job is Non-Negotiable (And a Bit Scary)
First, the scary bit to keep us motivated. The petrol engines in the Mk3 Focus (the 1.6 and 2.0 Ti-VCT units) are what’s known as interference engines. This means the space where the pistons travel and the space where the valves open overlap. The timing belt is the only thing ensuring they never meet. If the belt snaps or jumps timing, the pistons and valves collide at high speed. The result is catastrophic engine damage—bent valves, smashed pistons, destroyed cylinder heads. We’re talking a repair bill that often exceeds the car’s value.
Ford’s official service interval for this component is 10 years or 150,000 miles, whichever comes first. This age-based guideline is crucial; even a low-mileage 2012 car is due now based on time alone. Rubber degrades, tensioners wear. This job is the ultimate in preventative medicine.
The Golden Rule: You Never Just Change the Belt
This is the most important insight for a successful job. A timing belt is part of a system. Replacing only the belt is a false economy and a major risk. You must replace the entire system in one go. A proper timing belt kit will include:
- The new timing belt.
- A new hydraulic tensioner (the device that keeps the belt tight).
- New idler pulleys (which guide the belt).
Crucially, on the 1.6 and 2.0 engines, the water pump is driven by the timing belt. If it fails 20,000 miles later, you have to repeat 95% of this labour-intensive job just to get to it. Therefore, a new water pump is mandatory. Top-quality kits from manufacturers like Gates or Continental often include a water pump. For peace of mind, many mechanics, including DIYers on forums like Focus Fanatics, insist on using an OE-quality or genuine Ford pump.
You’ll also need fresh coolant (meeting Ford specification WSS-M97B44-D) and a new auxiliary drive belt (the one that runs your alternator, A/C, etc.), as you have to remove it.
This is the key comparison every owner must make. Let’s break it down honestly.
Toolkit & Prep: Don’t Start Until You Have This
Rushing in will end in tears. You need, at a minimum:
- A good quality socket set, torx bits, and extensions.
- A sturdy jack and axle stands – safety is paramount.
- A torque wrench – critical for reassembly.
- Engine support bar or a strong piece of wood to support the engine when the right-hand mount is removed.
- The special locking tools. This is non-negotiable. You need camshaft locking pins and a crankshaft locking tool specific to the Sigma/Ti-VCT engine. These can be bought as a set online for a reasonable price. They are your insurance policy for keeping everything in time.
- A marking pen, plenty of rags, and a clean workspace.
Step-by-Step: The Road to a New Timing Belt
Here is a logical overview of the process. This is not a substitute for a full workshop manual, but a guide to the key stages and challenges.
1. Preparation is Everything: Disconnect the battery. Drain the coolant from the radiator block drain plug and the engine block plug. Remove the air intake assembly for access. Support the engine securely from above.
2. Gaining Access: Remove the right-hand engine mount. This is a key step and why you need the engine support. Loosen and remove the auxiliary drive belt and its tensioner. You can now remove the timing belt upper and lower covers.
3. Locking Everything in Time: This is the heart of the job. Using your special tools:
* Rotate the engine (using a socket on the crankshaft pulley bolt) until the timing marks align. The crankshaft should be at Top Dead Center (TDC).
* Insert the crankshaft locking tool to pin the crank in place.
* Insert the two camshaft locking pins through the holes in the camshaft sprockets and into the cylinder head. This locks the cams in the correct position relative to the crank. Double-check everything is locked before you proceed.
4. The Moment of Truth – Belt Removal: Release the tension on the old timing belt by loosening the hydraulic tensioner. You can now carefully remove the old belt, idlers, and tensioner. Take your time here—note the routing of the belt around the sprockets and water pump. Taking a photo beforehand is a great idea.
5. System Renewal: Clean any debris from the area. Install the new idler pulleys and tensioner (finger-tight only for now). Fit the new water pump with a suitable sealant or gasket. This is a perfect time to check the condition of your crankshaft oil seal for any leaks, as it’s now visible.
6. Fitting the New Belt: This requires patience. Route the new belt according to your photo or manual diagram, ensuring there is no slack on the tension side (usually between the crank and the exhaust cam). The belt teeth must mesh perfectly with the sprockets. Once routed, release the hydraulic tensioner to apply tension. Follow the specific procedure—often it involves turning the engine two full revolutions by hand and then re-checking the locking tools align perfectly. This step ensures the tension is correctly set after the system has settled.
7. Reassembly & Final Checks: Once you are 100% confident the timing is correct and the tension is set, remove the locking tools. Reinstall the timing covers, engine mount, and auxiliary drive belt. Refill the cooling system with fresh coolant and bleed it carefully to avoid airlocks—a common post-job issue documented in many online workshop guides. Reconnect the battery.
The Big Choice: DIY vs. Professional
| Aspect | The DIY Route | The Professional Garage Route |
|---|---|---|
| Cost | £150 – £300 for premium parts (kit, pump, coolant, belts). Plus tool investment. | £500 – £800+ for parts and labour at an independent specialist. |
| Time | A full weekend or two for a first-timer, allowing for careful work and double-checking. | Usually a single day in the workshop. |
| Risk | High if steps are missed or done incorrectly. Engine damage is the consequence. | Low. A reputable garage will offer a warranty on parts and labour. |
| Reward | Immense satisfaction, deep knowledge of your car, and significant cash savings. | Convenience, speed, and peace of mind from a guaranteed job. |
| Best For… | The methodical, well-prepared enthusiast with tools, space, and patience. | Anyone who values time over money, or lacks the confidence/space for such a major job. |
Key Insights & Final Thoughts
- The Water Pump is Part of the Job: I can’t stress this enough. Not changing it is the biggest mistake you can make after doing all this work.
- The Locking Tools are Your Best Friend: They are not a “nice-to-have”; they are essential. They remove guesswork and are the single greatest factor in preventing a catastrophic mistake.
- Cleanliness is Critical: A single piece of grit on a sprocket or in the new tensioner can cause premature wear. Keep everything clean.
- The First Start is Nerve-Wracking: After everything is back together, the first start-up will make your heart race. Listen for any unusual rattles or grinding. Check immediately for coolant leaks and ensure the temperature gauge behaves normally.
Replacing the timing belt on your Mk3 Ford Focus is a rite of passage. It’s a job that demands respect, but it repays you with security and the profound confidence that comes from having personally safeguarded the heart of your car. Whether you choose to roll up your sleeves or write the cheque to a trusted professional, the imperative is the same: don’t ignore it. That humble rubber belt is the guardian of your engine’s health. Give it the attention it deserves, and your Focus will repay you with many more miles of faithful service.