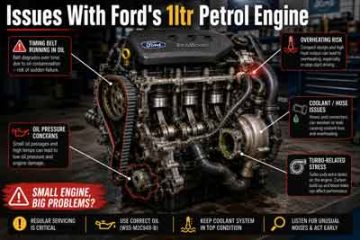
How to Remove the Front Shock absorber on a Ford Focus Mk3 (2011–2018)
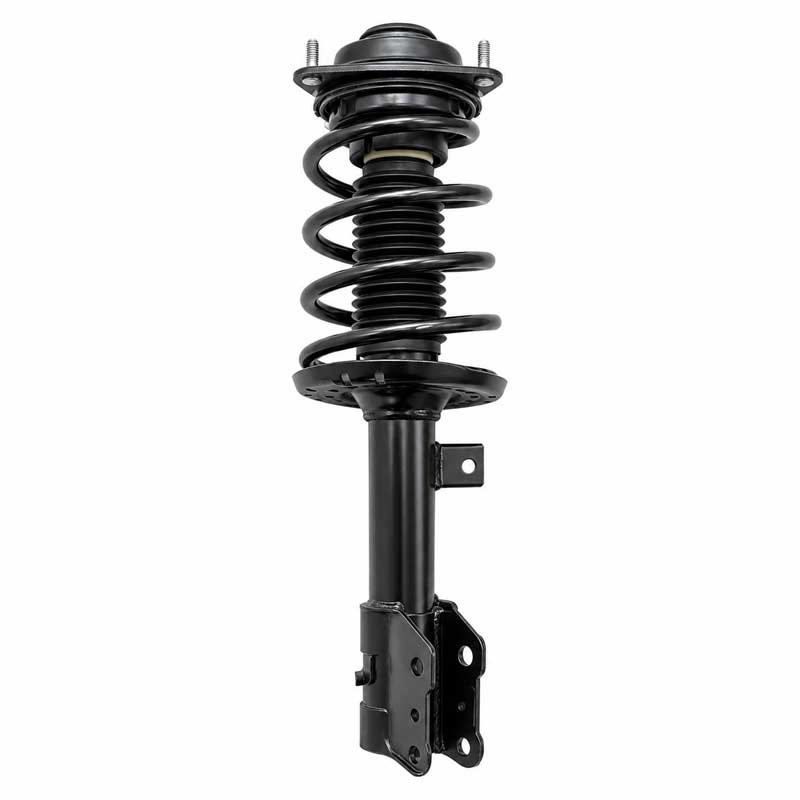
The front shock absorber is one of those parts most drivers never think about — until things go wrong. On a MacPherson strut layout like the one fitted to the Mk3 Ford Focus, the “shock absorber” is actually the entire strut assembly: a hydraulic damper, a coil spring wrapped around it, and a top mount that connects everything to the car’s body.
How It Works and Why You Should Care
In basic terms, the strut’s job is to keep your tyre pressed firmly onto the road surface. Every time you hit a pothole, cross a speed bump, or brake hard, the spring absorbs the initial hit and the damper controls how quickly the suspension returns. Without that control, the car would bounce and skip like a supermarket trolley. Beyond ride comfort, these components directly affect braking distances, steering response, and tyre contact — so a worn unit isn’t just uncomfortable, it’s a safety issue.
The Mk3 Focus uses a twin-tube hydraulic gas-pressurised strut on the front axle. Ford spec’d a fairly compliant setup for the standard models — enough to soak up British roads without being wallowy — and it works well when fresh. The trouble is that after 50,000 miles or so, the internal valving starts to degrade. The damper loses its ability to control spring movement, and suddenly that “soft” feeling you noticed isn’t comfort, it’s wear.
Generation Variants: Not All Mk3s Are Equal
This is where it gets interesting, because calling it a single generation hides quite a bit of variety. The standard Mk3 Focus (2011–2018) — sold as a hatchback, saloon, estate, and even a van — uses a conventional passive strut. The Focus ST (2012–2018), with its stiffer springs and uprated geometry, uses a mechanically firmer version of the same basic design. The Focus RS (2016–2018) is in a completely different league: it came fitted with Ford Performance’s adaptive continuous damping control (CDC) suspension, where the damper stiffness is adjusted electronically by the ECU depending on the selected drive mode — Normal, Sport, or Track.
That RS adaptive system is a game-changer when it works, but when it fails, you cannot simply bolt on a standard passive strut and drive away happy. Ford’s system expects a signal from each corner, and an ECU fault will follow if you swap an adaptive unit for a passive one without a cancellation kit or a like-for-like replacement. Companies like TracTive and KW make plug-and-play electronic replacements that maintain full drive mode function, but they cost considerably more than a standard strut.
Symptoms of a Failing Unit
The textbook symptoms — vibrations, nose dive under braking, uneven tyre wear — are real, but they develop slowly, which is part of why people miss them. The more useful early warning signs are a vague, wandering steering feel on motorways, a clunking or knocking noise from one corner over speed humps, and the front end “floating” slightly after you release the brakes. A quick test: push down hard on each front corner of the car and release. A good strut will return once and settle. If it bounces two or three times, the damper is on its way out. On the adaptive RS, you may also get a suspension fault warning on the dashboard before you notice anything physically.
One thing many guides skip over: a worn top mount bearing causes nearly identical symptoms to a failing damper. Before you condemn the whole strut, rock the steering wheel from side to side with the car stationary — a clunk or roughness through the wheel is often the bearing, not the damper itself, and the bearing alone is a much cheaper fix.
Generation Comparison
| Generation | Strut Type | Typical Use Case | Est. Replacement Cost (per side, parts only) |
|---|---|---|---|
| Focus Mk3 Standard (2011–2018) | Passive twin-tube gas strut | Daily driver, comfort-biased | £30–£90 aftermarket / £187 OEM |
| Focus Mk3 ST (2012–2018) | Passive strut, uprated valving | Sporty road use | £60–£120 aftermarket |
| Focus Mk3 RS (2016–2018) | Adaptive CDC electronic strut | Performance / track-capable | £500–£600+ OEM equivalent |
Part Numbers and What to Buy
For the standard Mk3 Focus, the OEM Ford references to know are BV61-18K001 (nearside/left) and its offside equivalent, with the product numbers 1710069 (N/S) and 1709762 (O/S) listed by Ford UK directly. For the RS, the CDC adaptive units carry references such as G1FY-18B061-AC and G1FY-18B061-AE.
When buying, genuine Ford OEM units are the safe bet but come at a premium — around £187 each from Ford’s own shop. Branded aftermarket from the likes of Bilstein (part 19-217154), Monroe, or Meyle will serve the average driver perfectly well and sit in the £60–£120 bracket. Budget options exist from £30 a corner, and while they’ll get the job done, expect to replace them again sooner. Avoid unbranded units with no OEM cross-reference — the spring seat dimensions on the Mk3 strut are specific, and a poorly fitting unit can cause the spring to seat incorrectly.
Remanufactured units are rarely worth the saving on a strut — the internal valving is the part that fails, and a reman damper is a bit of a lottery. Stick to new.
Red flag most people miss: Always check whether your car has ride height sensors or adaptive damper connectors before ordering. Even some non-RS Mk3s sold with the optional “Comfort Pack” or in certain European markets came with load-dependent rear damping linked to the ABS module. Pull back the wheel arch liner at the top of the strut and check for any electrical connectors before you buy parts. Ordering a passive strut for a car that expects an electronic one is an expensive mistake.
[INSERT IMAGE: Ford Focus Mk3 strut top mount area showing electrical connector location]
Part 2: Removing the Front Shock Absorber — Mk3 Ford Focus (2011–2018)
Which Variant This Guide Covers
This guide is written for the standard Mk3 Ford Focus (2011–2018) with a passive MacPherson strut — that includes the 1.0 EcoBoost, 1.5 and 1.6 petrol, 1.5 and 2.0 TDCi diesel, and the ST with its uprated setup (same process, just heavier components). The adaptive RS strut is not covered here — if you have an RS, the electrical connections and CDC system add complexity that goes beyond this guide.
The job is well within the abilities of a capable home mechanic. You will need a spring compressor — that’s non-negotiable — and ideally an impact gun speeds the whole thing up considerably. Plan for around two hours the first time.
The One Thing Most Guides Forget: The Pinch Bolt Is a Yield-to-Yield Fastener
Here’s the bit that catches people out. The lower pinch bolt — the one that clamps the strut into the steering knuckle — is a torque-plus-angle fastener on the Mk3 Focus. This means once it’s been tightened, it has permanently deformed and must be replaced, not reused. This isn’t a suggestion, it’s a safety-critical requirement. Order two new lower pinch bolts (one per side if you’re doing both) before you start. They’re a couple of quid each from any Ford dealer or motor factors, and skipping this step is exactly the kind of thing that causes suspension failures months down the line. The same applies to the top strut mount nuts — replace those too.
Phase 1: Removing the Strut
Tools you’ll need: 13mm socket and ratchet or spanner, 15mm socket and spanner, 18mm socket, Torx T55 bit, Torx T40 bit, spring compressor (rented or borrowed from a motor factors), breaker bar, impact gun (optional but helpful), flat chisel or spreader tool, WD-40 or Plus-Gas, hydraulic jack and axle stands, wheel chocks.
- Loosen the wheel nuts before jacking the car. With the car on the ground, break the five wheel nuts using a 19mm socket and breaker bar. Don’t remove them yet — just crack them free.
- Jack the car up and support it on axle stands. Position the stand under the front jacking point behind the front wheel. Remove the wheel completely and set it aside.
- Soak the lower pinch bolt in Plus-Gas or WD-40 now. Give it a good soak at the front of the steering knuckle while you work on the easier bits. The lower pinch bolt is a Torx T55 on the bolt head with an 18mm nut on the other side, and it will likely be corroded — especially on any car that’s seen a British winter. Give it five minutes minimum.
- Disconnect the anti-roll bar drop link from the strut. The drop link attaches to a bracket on the side of the strut body. Use a 15mm socket on the nut and a 15mm open spanner (or the correct hex insert) to hold the link pin from spinning. Undo it fully and tuck it out of the way.
- Detach the brake hose and ABS sensor cable from the strut. These clip into brackets welded onto the strut body. The brake hose has a single spring clip — lever it out with a flat-blade screwdriver. The ABS sensor cable usually pops out of its retaining clip by hand. Don’t strain either cable — you’re not disconnecting them, just releasing them from the strut so they have slack when you pull the assembly down.
- Open the bonnet and locate the three top mount nuts. In the engine bay, at the inner front corners, you’ll find a plastic pollen filter / cowl panel. Remove the lower section using a Torx T30 screwdriver to reveal the top of the strut. Three 13mm nuts secure the top mount to the body. Leave them finger-tight for now — don’t fully remove yet.
- Remove the lower pinch bolt. Use your T55 Torx on the bolt head and an 18mm socket on the nut. If it’s stubborn, use an impact gun or apply heat carefully around the knuckle (not on the strut itself). Once the bolt is out, use a flat chisel or a dedicated knuckle-spreading tool to gently open the clamp on the steering knuckle. You’re not prying the strut — you’re opening the pinch slot just enough to free the strut stub. A few light taps with a rubber mallet on the knuckle itself can help the strut slide free downward.
- Support the hub and knuckle with a trolley jack. Put the jack under the lower arm or hub carrier — just enough to take the weight so the assembly doesn’t drop away suddenly when the strut releases.
- Fully remove the three top mount nuts. Back at the engine bay, wind off those three 13mm nuts. Hold the strut from below as you remove the last nut — the whole assembly will drop once it’s free.
- Pull the strut assembly clear. Lower the hub carefully on the trolley jack, then work the strut stub out of the knuckle clamp and pull the whole assembly down and out of the wheel arch. It’s heavier than it looks — around 5–6kg including the spring.
Torque Specifications
| Component | Fastener Size | Torque (Nm) |
|---|---|---|
| Top strut mount nuts (×3) | 13mm | 35 Nm |
| Strut piston rod nut (spring reassembly) | Torx T40 / 19mm | 50 Nm |
| Lower strut pinch bolt | T55 / 18mm | 83 Nm (replace bolt — do not reuse) |
| Anti-roll bar drop link to strut | 15mm | 48 Nm |
| Track rod end nut (if disturbed) | 18mm | 48 Nm |
| Wheel nuts | 19mm | 135 Nm |
Note on pinch bolt: Some sources quote an additional torque-plus-angle stage. Always use a new bolt and torque to 83 Nm as a minimum. Check Ford Workshop Manual for your specific model year if you have access to it.
Phase 2: Refitting — It’s Not All Simply the Reverse
Most of installation is indeed the reverse of removal, but there are a few points where doing it wrong will bite you later.
If you’re fitting a new damper and transferring the spring and top mount, you need a spring compressor. Compress the spring enough that it is held securely but not fully compressed, then slide it onto the new damper body. Make sure the spring end locates correctly in the lower spring seat — there’s a notch it needs to sit in. A misaligned spring causes a creaking noise and uneven load distribution.
Refit the top mount and tighten the new piston rod nut to 50 Nm using a Torx T40 on the rod and a 19mm spanner on the nut — hold the rod to stop it spinning as you torque up. Slowly release the spring compressor, checking the spring remains properly seated as it loads up.
Offer the strut back up into the engine bay first, locating the three studs through the body, and start the new 13mm nuts a couple of threads by hand. This stops it dropping while you work the bottom into the knuckle. Guide the strut stub into the knuckle clamp — it should sit squarely in the groove. Fit the new lower pinch bolt, torque to 83 Nm.
Reattach the anti-roll bar drop link to 48 Nm, then refit the brake hose and ABS cable into their brackets — don’t forget either of these, as a loose hose can rub through within weeks. Torque the three top mount nuts in the engine bay to 35 Nm in a star pattern to pull the mount down evenly.
One thing that is not simply the reverse: the wheel nuts should be torqued in a cross pattern with the car back on the ground, not while it’s in the air. Torque to 135 Nm.
For the Focus RS with adaptive dampers: plug the electrical connector back in before testing — the system runs a self-check on startup and will throw a fault if any corner is disconnected.
After any suspension work, book a wheel alignment. Even if you’ve been careful not to disturb the top mount angle, the geometry will be out enough to cause uneven tyre wear and slightly offset steering. Factor £50–£80 into your budget for a four-wheel alignment at a local tyre shop or independent garage.
[INSERT IMAGE: Spring correctly seated in lower spring seat on strut body]
[INSERT VIDEO: YouTube search “Ford Focus Mk3 front strut spring compressor reassembly”]
Is It Worth Doing Yourself?
Honestly, yes — for most people. A decent quality aftermarket strut (Monroe, Meyle, or similar) will cost £60–£90 per corner. A garage will typically charge £100–£150 labour per side in addition to parts, so you’re looking at £160–£240 per corner at a main dealer or indie, or more if they mark up the parts. DIY saves you somewhere in the region of £150–£250 on a pair, plus you know exactly what’s gone on the car.
The one cost to factor in: if you don’t own a spring compressor, a rental from Halfords or a local motor factors runs about £20–£30. It’s worth buying a decent one outright if you plan to maintain the car yourself going forward — cheap spring compressors are a false economy and a genuine safety risk.
The adaptive RS unit is a different matter. At £500–£600 per corner for a like-for-like OEM replacement, the labour saving is less significant, and the job carries more risk if the ECU calibration isn’t right. On an RS, a specialist with Ford IDS diagnostic software is worth the outlay.
Difficulty Rating: ⚙️⚙️⚙️☐☐ — 3/5 Spanners
A straightforward job made moderately challenging by the spring compressor step and the often-seized lower pinch bolt — both demand patience and the right tools rather than brute force.