The Nerve Center: Unpacking the Ford Focus Centre Console
If you spend any time behind the wheel of a Ford Focus, you know there’s one place your hand gravitates to more than the steering wheel: the centre console. It’s the command center of your daily drive. But if you’ve ever tried to find a specific trim piece or wondered why your 2015 model feels so different from your buddy’s 2018, you know that the “Focus console” isn’t a one-size-fits-all situation.
Let’s pop the hood on the interior and look at how this dynamic space evolved. Whether you’re hunting for a replacement gear surround or just want to appreciate the engineering, here’s the lowdown on the Ford Focus centre console.
The Great Divide: MK2 vs. MK3 vs. MK4
Ford has a habit of completely rethinking the interior with each generation. If you are sitting in a Mk2 Focus (2004–2011), you are looking at what I like to call the “soft-touch era.” Ford was obsessed with making the cabin feel premium. The center stack was famously wrapped in a soft-tactile material that felt great… until it started melting into a sticky mess in the sun.
Moving to the Mk3 Focus (2011–2018) , things got angular. This was the era of MyFord Touch. The console became wider, housing a towering screen (if you had the option) and a switchblade-style key slot. For the Mk3.5 facelift (2015–2018) , Ford simplified things, ditching the mass of tiny buttons for a cleaner, more intuitive layout.
Then came the Mk4 (2018–present) . This is where minimalism meets tech. The console is now a floating bridge design, often finished in gloss black (a magnet for fingerprints, but gorgeous in photos) housing a rotary gear selector instead of a stick in automatic models.
Material Science and Those Pesky Part Numbers
One of the biggest conversations in Focus forums revolves around the durability of the materials. If you’re looking to replace a scratched unit, knowing the OEM numbers is key.
For the Mk3 Focus (2012-2014) , the center console bezel (the big plastic piece surrounding the radio and HVAC controls) is notoriously brittle. If you have the Sony Audio System, you’re looking for the specific trim with the chrome dials, often listed under OEM part numbers starting with BM5T-044 variants.
For the Mk4, Ford shifted manufacturing to use a high-gloss PC/ABS (Polycarbonate/Acrylonitrile Butadiene Styrene) blend. It’s durable but scratches easily. If you’re retrofitting a wireless charging pad into a Mk4, you’ll need the specific upper tray assembly, often referenced as JX6B-19 series.
To help you navigate the differences, here is a quick cheat sheet on how the generations stack up:
| Feature | Mk3 Focus (2012-2014) | Mk3.5 Focus (2015-2018) | Mk4 Focus (2019+) |
|---|---|---|---|
| Design Vibe | Angular “Tech” Stack | Simplified, Wider Layout | Floating Bridge, Minimalist |
| Key Material | Hard Plastic / Soft-Touch Paint | Hard Plastic / Piano Black | PC/ABS Gloss Black / Suede |
| Shifter Type | Traditional Mechanical Lever | Traditional Mechanical Lever | Rotary Dial (Auto) / Manual Lever |
| Common Issue | Sticky soft-touch coating peeling | Loose cupholder springs | Gloss black scratching easily |
Insights: Why the Console Matters More Than You Think
The evolution of the Focus console tells a bigger story about how we interact with cars. In the Mk2, the console was about acoustic comfort—hiding the mechanics. By the Mk3, it became about connectivity. That’s where Ford started integrating the SYNC module. If you have a pre-2015 model and are experiencing Bluetooth drops, the issue often isn’t your phone; it’s the SYNC module (Part# CM5T-14D212-xx) located behind the climate control unit.
In the current Mk4, the centre console has become structural. It houses the electronic parking brake module, which is a common replacement item if you hear a whining noise when you start the car. It’s fascinating that a part that started as simply a place to rest your elbow now controls the vehicle’s parking systems and houses the gateway module for the car’s entire network.
The Verdict
Whether you are restoring a classic Mk2 RS or speccing out a new Mk4 ST-Line, the centre console is the soul of the interior. My advice? If you have a Mk3 with the sticky rubber coating, don’t try to paint over it—look for a replacement bezel from a 2015+ model, which uses a harder, more durable polymer.
The Ford Focus might have changed its face over the years, but the centre console remains the one piece of the puzzle you interact with on every single drive. Choose the right one, keep it clean, and it will make your daily commute feel a whole lot more premium.
Guide To Replacing The Centre Console Of A Ford Focus MK3
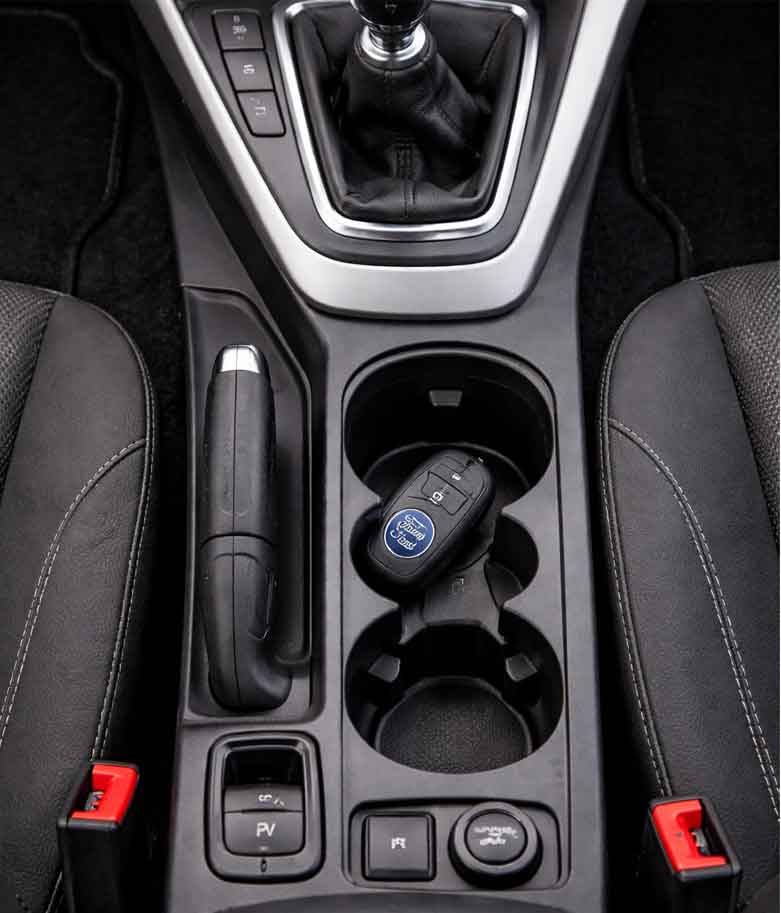
The centre console of your Ford Focus MK3 is probably the most touched surface in your car. Your elbow rests on it, your coffee sits in it, and your fingers dance across it every single day. And after a few years? Well, things start to show their age.
Maybe you’ve noticed that soft-touch coating has gone from “premium feel” to “sticky mess.” Perhaps the cupholder springs have given up, or you’re just tired of looking at scratches on the glossy trim. Whatever your reason, replacing the centre console of a Ford Focus MK3 is one of those DIY jobs that feels intimidating but is surprisingly achievable with the right guidance.
I’ve dug through forums, sourced OEM part numbers, and gathered insights from people who’ve actually done this job. Whether you own a pre-facelift (2011-2014) or facelift (2015-2018) MK3, this guide will walk you through everything you need to know.
Understanding Your MK3: Pre-Facelift vs. Facelift Differences
Before you start buying parts, you need to know exactly what you’re working with. The Ford Focus MK3 had a significant facelift in 2015, and the centre console changed in ways that matter for replacement.
The pre-facelift MK3 (2011-2014) features the infamous soft-touch rubberised coating that Ford used extensively. It feels great when new but has a nasty habit of breaking down into a sticky, gooey substance over time—especially in warmer climates. The centre stack is more angular, with a higher number of buttons surrounding the display.
The facelift MK3.5 (2015-2018) simplified things considerably. Ford ditched the problematic soft-touch coating for harder, more durable plastics. The button layout was streamlined, and the overall design became cleaner and more modern. The cupholder assembly was also revised with more robust spring mechanisms.
If you’re planning a full console swap, you’ll need to ensure compatibility between generations. While the physical mounting points remained similar, the electrical connectors for switches and the HVAC controls changed.
Tools You’ll Need For The Job
Based on real-world experience from the Ford community, here’s what you’ll want to have on hand before you start:
A quick tip from the trenches: do this work from the passenger seat. It’s far easier to access screws without the steering wheel in your way.
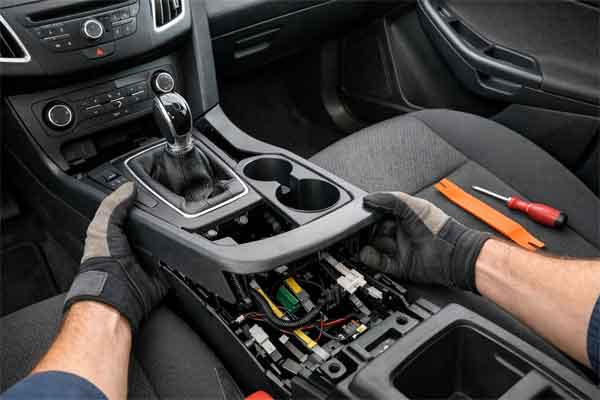
Step-By-Step Console Removal: What The Guides Don’t Tell You
I’ve synthesised instructions from multiple sources to give you a clear roadmap. The process differs slightly between manual and automatic transmissions, so adapt accordingly.
1. Start With The Head Unit
Insert your radio removal keys into the slots on either side of the factory head unit. Push until you feel the clips release, then pull the unit forward. Before disconnecting anything, take a photo or make a quick sketch of what plugs go where—power, aerial, speakers, and the remote stalk connector all look similar.
2. Remove The Gear Knob And Gaiter
For manual transmissions, unscrew the gear knob. On pre-facelift models with lift-up reverse, be careful—the spring is under tension. Lift the knob off gently and store it somewhere safe.
The gearstick gaiter and surround are held by small yellow pins. A gentle pull with trim tools releases them. The top of the gaiter has an elasticated collar that pulls over the lift-up collar for complete removal.
3. Remove The Side Trim Panels
There’s a screw in the footwell end of each side panel. Remove these, then the panels simply clip out. Set them aside.
4. Release The Switch Bank
Reach behind the centre console switches (hazard lights, heated screens, boot release, ESP, heated seats depending on your model) and push them forward from behind. Crucially, label each connector with masking tape before unplugging. The connectors look identical, and guessing which is which during reassembly is a nightmare.
5. Remove The Screws
This is where patience pays off. The console is held by several screws in specific locations:
- Two inside the radio cavity (one either side)
- Two on either side of the console exterior
- Two tucked right up under the bottom of the console (the awkward ones)
- Two further up the console, one behind the hazard switch location and one behind the heated screens switch
- Three 8mm bolts inside the armrest storage compartment
- One screw under the cigarette lighter section
If you have an automatic transmission, you won’t need to worry about the gear gaiter removal, but you may need to carefully work around the selector mechanism.
6. Disconnect And Release
At this point, the console is still connected by the climate control and clock wiring. Reach behind and disconnect these—the climate control connector has a folding clamp mechanism that can be confusing. Pull the locking tab, then squeeze to release.
Now for the moment of truth: the console is held at the top by two meaty clips. Pull firmly in a forward and downward direction (diagonally toward where the gear knob was). You won’t break them, but it takes courage. Once released, carefully manoeuvre the console out, watching the still-attached cupholder at the bottom.
Common Replacement Scenarios And Part Numbers
Now that you know how to remove the console, let’s talk about why you might be doing this in the first place.
The Sticky Coating Problem
If you own a pre-facelift MK3, you’ve likely encountered the dreaded sticky centre console syndrome. The soft-touch paint breaks down into a tacky residue that transfers to anything it touches. The solution? Either strip and repaint (a messy process) or replace with a facelift console.
The official Ford cupholder insert assembly carries part number 1781016 with engineering number BM51-A046B94-BA35B8 and fits 2015-2020 models. For a full centre console replacement on 2015-2018 models, the OEM centre console assembly is F1EZ58045A36AA.
Sync 1 To Sync 3 Upgrades
One of the most popular MK3 modifications is upgrading from the base Sync 1 system to Sync 3. This involves replacing the screen, the APIM (Accessory Protocol Interface Module), and often the USB hub.
A forum member documented their upgrade of a 2012 Focus MK3 Titanium using an APIM from a 2017 Fiesta with part number KU5T-14G371-GDE. The process requires:
- A Sync 3 screen and APIM from a donor vehicle (Focus, Kuga, or Fiesta are common donors)
- A new USB hub with CarPlay/Android Auto support
- FORScan software to program the As-Built data
- Potentially a new centre console trim to accommodate the larger screen
Crucial insight: The APIM configuration must match your vehicle’s options. If you source an APIM from a different model, you’ll need to program it with As-Built data from a vehicle with identical features to yours. Using a VIN from a similarly-equipped 2018 Focus or Kuga is a common starting point.
Cosmetic Upgrades
If your console is mechanically fine but looking tired, you might consider cosmetic enhancements. ABS chrome trim overlays are available for the AC switch panel on 2015-2018 left-hand drive models. These stick on with double-sided adhesive and give a premium look without full replacement.
Insights From Those Who’ve Done It
The Ford community has accumulated some valuable wisdom worth sharing:
On wiring harnesses: When upgrading to Sync 3, pay close attention to the wiring harness. A forum member discovered their aftermarket harness from AliExpress wasn’t providing the ignition-switched wake-up signal, meaning the radio wouldn’t turn on with the ignition.
On climate control connectors: The air conditioning unit connector has a folding clamp mechanism that’s easy to overlook. Don’t force it—find the locking tab, fold it, and it releases cleanly.
On reassembly tricks: Before refitting the console, tie lengths of string around all the switch connectors and thread the string through the appropriate holes. When you’re putting the console back, pull the strings and the connectors magically appear where you need them.
On trim removal: If removing the plastic trim around the clock or gear gaiter, use plastic tools and apply pressure at the clip points specifically. Levering in the wrong place can bend or break the trim.
Pre-Facelift vs. Facelift: A Quick Comparison Table
Reassembly: Putting It All Back Together
Reassembly is essentially the reverse of removal, but a few tips will save you headaches:
- Reconnect everything before fully seating the console. Test that switches work, the hazard lights function, and the climate control responds.
- Use your string trick to pull connectors through their holes before clipping the console fully into place.
- Check the clips at the top—they need a firm push to fully seat. You’ll hear a click when they engage.
- Don’t overtighten screws. The plastic can crack if you go too hard.
- Test the head unit before final reassembly. It’s easier to troubleshoot wiring with everything still accessible.
Conclusion: Is This A DIY Job?
Replacing the centre console of a Ford Focus MK3 is absolutely a DIY-friendly project if you’re methodical and patient. The process takes a couple of hours for a basic replacement, longer if you’re doing a Sync upgrade that requires programming.
The biggest risks are damaging trim clips (use plastic tools and go slowly) and mis-wiring the switch bank (label everything). Beyond that, it’s straightforward—screws, clips, and connectors that were designed to be removed.
If you’re tackling the sticky coating problem, replacing with facelift parts eliminates the issue permanently. If you’re upgrading to Sync 3, do your homework on APIM compatibility and have FORScan ready.
Your MK3 Focus is a fantastic car, and refreshing the centre console is one of the most satisfying upgrades you can do—you interact with it every single drive. Get it right, and it’ll feel like a new car every time you get behind the wheel.