The Centre of the Ford Fiesta: A Dive into the Center Console
If you spend any time behind the wheel of a Ford Fiesta, you know that the center console is more than just a place to stash your coffee. It’s the command center of your daily drive. Whether you’re shifting gears, charging your phone, or just trying to find a spot for loose change, that plastic hub between the seats plays a massive role in how the car feels.
But have you ever stopped to think about the details? Depending on the year of your Fiesta—whether it’s the early Mk7 or a later model—that console tells a fascinating story about design, manufacturing, and even aftermarket customization. Let’s pop the hood on the interior and look at what makes this space tick.
A Tale of Two Generations: The 2011 vs. The 2015
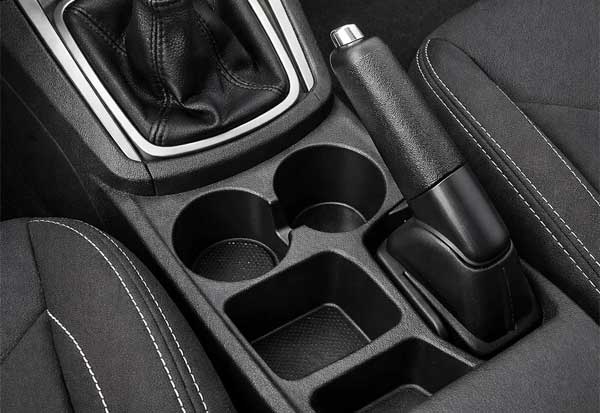
One of the first things you’ll notice when looking at Fiestas is that not all consoles are created equal. The design language shifted subtly over the years. For instance, if you look at a 2011 model, the owner’s manual highlights a fairly straightforward setup featuring front cupholders, a rear cupholder insert, and handy coin holders . It was functional, simple, and got the job done.
However, jump ahead to a 2015 Fiesta, and the part numbers tell a different story. You’ll see references to parts labeled with codes like B299MCA . This signifies a design iteration—usually featuring a more integrated look for the handbrake boot, different trim finishing, and often a revised layout for the auxiliary input and power outlets.
The Numbers Game: OEM Part Numbers You Should Know
If you’re ever hunting for a replacement or looking to verify if your console is original, the part numbers are your best friend. For the 2011 to 2013 model years (covering the S, SE, SEL, SES, and Titanium trims with the 1.6L engine), the go-to OEM number is BE8Z-54045A36-AA .
This is the official Ford Motor Company part, described simply as the “Console Base” in black. It’s a direct replacement item, meaning it’s built to the strict standards of safety and durability that Ford demands . If you have a right-hand drive (RHD) Fiesta from around 2009, you might even come across the code 8A6118D422BFW, which shows how specific these parts are to the vehicle’s steering configuration .
From Pellets to Part: How It’s Made
Here’s a cool insight that changes how you look at that plastic unit: manufacturing matters. The Fiesta’s interior parts, including the center console, were part of an innovative production process.
Back when the Fiesta was in its prime, facilities like the one in Bahia, Brazil, utilized a “pellet-to-part” manufacturing operation . Essentially, plastic pellets (specifically polypropylene resins) would go into a massive injection molding machine, and out came the finished trim piece. The goal was efficiency. These consoles were often produced on-site and delivered to the assembly line on a just-in-time basis . So, that console in your car didn’t just come from a warehouse; it was likely born in the same factory complex as the car itself, designed for a precise fit from the very beginning.
Upgrading the Hub: The Aftermarket Touch
For the enthusiasts out there, the center console is also a canvas. Because the Fiesta has such a passionate following, there are some really neat upgrades available. One of the most popular is the Mountune Centre Console Insert .
Designed specifically for the Mk7 Fiesta (particularly models with heated seat buttons), this is a 3D-printed piece made from durable black nylon and micro-carbon fiber filament. It’s essentially a high-tech sticker that gives the area around your gearstick and buttons an “OE level of finish” (OE meaning Original Equipment) with a sporty twist . It’s a perfect example of how a simple piece of plastic can become a style statement.
Comparison Snapshot
To help you navigate the differences, here is a quick look at the variations you might encounter:
The Final Verdict
Whether you’re restoring a classic Mk7 to factory specifications using a genuine Ford BE8Z54045A36AA base, or you’re sprucing up your daily driver with a Mountune insert, the center console is a defining feature of the Fiesta experience. It’s a testament to how Ford balanced mass production efficiency—like the just-in-time assembly methods in Brazil—with the practical needs of drivers.
So next time you set your drink down or plug in your phone, take a second to appreciate the engineering and design that went into that small, yet vital, space. It’s the unsung hero of the interior.
How To Replace The Centre Console Ford Fiesta MK7: A DIY Guide
The centre console in your Ford Fiesta MK7 takes a beating. It’s where coffee meets morning commutes, where elbows rest on long drives, and where that little storage lid eventually decides it’s had enough. If you’re reading this, chances are you’ve got a broken clip, a sticky surface, or you’re just ready for an upgrade. The good news? Swapping it out isn’t nearly as intimidating as it sounds.
Grab a trim tool, maybe a coffee, and let’s walk through exactly how to replace the centre console in your MK7 Fiesta. I’ll cover the tools you need, the part numbers to look for, and a few insider tips that’ll save you from breaking those fragile plastic clips.
First Things First: Which MK7 Do You Have?
Before you start prying anything apart, you need to know exactly which generation you’re working with. The Ford Fiesta MK7 covers a decent stretch of years, but there are actually two distinct phases that matter here.
The pre-facelift models (roughly 2008–2012) have a slightly different interior layout compared to the facelift models (2012–2017). The dashboard, centre console, and even the way the armrest attaches can vary. For instance, an armrest assembly with the part number C1BB-A045B54-BS is specifically designed for the MK7 facelift models from 2012 to 2017 . If you’re grabbing a used part from a breaker yard or eBay, always check the compatibility notes.
Ford also sold a Dashboard Centre Lid for the early MK7s (2008–2010) with the OEM number 8A61-A061B62-AFW. This little lid sits on top of the dashboard, not the centre console, but it’s a common failure point—people often slam it shut and snap the clip . Knowing your exact year and trim (Zetec, Titanium, ST-Line) is half the battle.
The Two Main Console Types: What You’re Actually Replacing
Depending on your model, you might be dealing with one of two scenarios: a full centre console replacement (the entire tunnel from the handbrake to the dash) or just a fascia swap (the radio and climate control panel).
The full centre console usually includes the armrest (if equipped), the gearstick surround, and the storage bin. For facelift models, a genuine Ford unit carries the part number C1BB-A045B54-BS, and it’s often finished in a leather-look material for the higher trims .
The fascia, on the other hand, is the front-facing trim that houses your radio, SYNC screen, and HVAC controls. If you’re upgrading your stereo or replacing a cracked bezel, you’ll be dealing with the fascia. These vary widely—from factory-fit units for OEM restorations to specific brand fascias designed for Pioneer or Sony head units .
What You’ll Need: Tools and Materials
You don’t need a full workshop for this job. Here’s the shortlist:
- Plastic trim removal tools (metal screwdrivers will leave marks)
- Torx screwdriver set (T20 and T25 are the most common)
- Flathead screwdriver (wrapped in tape for prying)
- Replacement console or fascia (with matching OEM number)
- Small container (for screws—trust me, you don’t want to lose these)
If you’re working with a used part like the C1BB-A045B54-BS armrest assembly, expect it to need a bit of cleaning. Most salvaged units come with “small scuffs and scratches on plastic” , but that’s nothing a good interior cleaner and some patience can’t fix.
Step-by-Step: How To Replace The Centre Console
Step 1: Disconnect the Battery
Modern Fiestas don’t like having their wiring messed with while the power is on. Disconnect the negative terminal—especially if you’re unplugging the radio, hazard switch, or any airbag-related components hidden near the fascia.
Step 2: Remove the Gearstick Surround and Fascia
Start by gently prying up the trim around the gearstick. It usually clips in place without screws. Lift it carefully—the plastic can be brittle, especially in older cars.
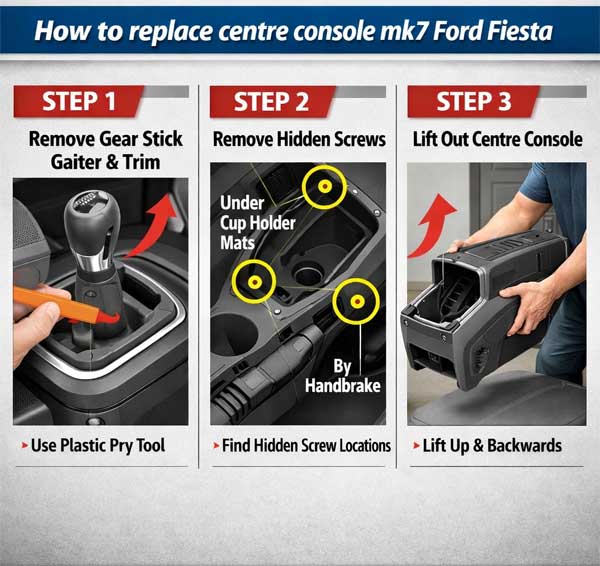
Next, work on the fascia panel. If you have a factory-fit system, you’ll likely need to remove a few Torx screws after the trim is off. The D2BZ-54045A76-CD console panel is precision-built to Ford’s standards, meaning it fits snugly . That’s great for rattles, but it means you’ll need to be patient when releasing the clips.
Step 3: Unplug the Wiring
This is where things get delicate. The fascia houses connectors for:
- Hazard light switch
- Radio/display unit
- Heated seat switches (if equipped)
- 12V power outlet
Each connector has a small release tab. Press and pull gently. Do not yank on the wires.
Step 4: Remove the Centre Console (If Replacing the Full Unit)
For a full console replacement, you’ll need to:
- Remove the rear cupholder or storage bin
- Unscrew the bolts at the back (usually under a plastic cover)
- Lift the console over the handbrake
Some consoles have metal inserts or high-strength steel reinforcements around mounting points to maintain crash integrity . If yours has these, make sure you transfer any brackets over if your replacement console came without them.
Step 5: Transfer Components and Install the New Console
If you’re swapping in a used console, transfer over anything that’s missing—like the 12V socket, foam pads, or the little rubber mats. Install in reverse order: slide the console over the handbrake, bolt it down, and work your way forward.
When refitting the fascia, plug in all your connectors before pushing it fully home. Nothing worse than realising you forgot the hazard switch after it’s clipped in.
The Fascia Deep Dive: Materials and Variations
Here’s something most DIY guides don’t mention: the fascia material matters. Ford engineered these dash components using specific materials for safety and durability. The main body is usually ABS plastic—tough, impact-resistant, and easy to paint . Higher-end trims sometimes use polycarbonate blends for better UV resistance and shatterproof qualities, especially around the corners .
If you’re buying a used fascia, check for sun damage. Polycarbonate holds up well, but ABS can fade or become brittle over time.
For the performance crowd, some custom fascias use carbon fiber reinforced polymer—incredibly strong and lightweight, though usually reserved for show cars or ST upgrades .
The Aftermarket Option: Custom and Brand-Specific Fascias
Not everyone wants to stick with the factory look. If you’re upgrading to a touchscreen unit, you might need a specific brand fascia designed for Pioneer, Sony, or Kenwood units. These offer better fitment than universal kits and often include mounting brackets .
On the flip side, universal fascias are the budget-friendly option, but be warned—they can leave gaps around the edges and may require trimming or glue to fit properly . If you’re after a clean, professional finish, stick with factory-fit or brand-specific.
Pro Tips from the Trenches
- The common lid failure: On the early MK7, the dashboard centre lid breaks when people close it too fast. The replacement part 8A61-A061B62-AFW is a push-fit, no tools needed . It’s one of the easiest fixes you can do.
- Check the fuse box cover: If you’re working near the driver’s side console area, you might need to remove the fuse box cover. Ford sells genuine replacements (Product No. 1515045), but note that some of these require specialist knowledge to install—particularly if airbag modules are nearby .
- Armrest alignment: When installing a used armrest assembly like C1BB-A045B54-BS, test the hinge before bolting everything down. Some salvaged units have worn hinges or missing springs . A little silicone grease on the hinge points can make it feel like new.
Conclusion: Take Your Time, Enjoy the Process
Replacing the centre console in a Ford Fiesta MK7 is one of those jobs that feels satisfying because it’s tangible. You can see the difference immediately. Whether you’re fitting a genuine Ford D2BZ-54045A76-CD fascia for that factory-fresh look or swapping in a salvaged armrest to replace a broken one, the key is patience.
Take your time with the clips. Label your screws. And if you’re buying used parts from a breaker, double-check those OEM numbers—C1BB-A045B54-BS won’t fit a 2009 Fiesta, and 8A61-A061B62-AFW won’t do much for your 2015 model.
The MK7 Fiesta is a great car to work on because the interior is designed for assembly efficiency—which means with the right tools, disassembly is straightforward. So roll up your sleeves, get your trim tools out, and give your Fiesta’s centre console the refresh it deserves. You’ve got this.