
Ford Mondeo Mk4 Front Bumper Replacement
A cracked corner, a parking-scrape crease, or a fog light surround that's finally given up — the front bumper takes more punishment than any other body panel on the car, and on a Mondeo Mk4 it's a straightforward enough job once you've confirmed you're ordering the right cover for your car's build date.
Pre-facelift vs facelift: check this before you order
The Mk4 Mondeo was built across two distinct front-end styles: pre-facelift (2007–2010) and facelift (2010–2014). The two use different bumper covers that are not interchangeable — the facelift front end has a revised grille, fog light surrounds and overall shape. Buying a cover for the wrong version simply won't fit, so confirm which style your car has (or check the build date on your V5) before ordering anything.
| Damage | Likely fix | Note |
|---|---|---|
| Cracked corner or split at a mounting tab | Full bumper cover replacement | Plastic repairs are possible but rarely worth it on a structural mounting point |
| Parking scrape or crease, no cracking | Repair and repaint, or replace if creased through | A bodyshop can often save a creased-but-uncracked cover |
| Broken fog light surround or grille clip | Replace the affected sub-component | Doesn't always need the whole cover — check what's actually broken first |
Reference part numbers
There isn't a single genuine part number that covers the whole front bumper cover in the way a smaller component might have — it's typically ordered by facelift status and colour code from a dealer or bodyshop supplier rather than a universal reference. For the structural sub-components behind the cover, commonly referenced numbers include the reinforcement bar (1490200), the tow-eye cover (BS71-17A989-BA) and the bonnet/hood stop (7S71-16C618-AE). As always, confirm every part against your car's VIN before ordering — these numbers are a starting reference, not a guarantee across every build variant.
No torque spec is needed for the bumper cover's own fixings — it's held by a mix of plastic clips and trim screws rather than torque-critical bolts, so hand-tight is correct; forcing a stubborn clip is more likely to break it than a loose one is to fail.
Replacing the Front Bumper
Safety note: disconnect any fog light or parking sensor wiring before pulling the bumper clear, and support the cover as the last few clips release — it's light, but an unsupported edge can crack against the ground.
Tools and parts you'll need
- Correct bumper cover for your facelift status and colour
- Trim removal tool for plastic clips
- Screwdriver set for trim screws
- Replacement clips on hand, in case any originals break on removal (common on an older car)
Removal procedure
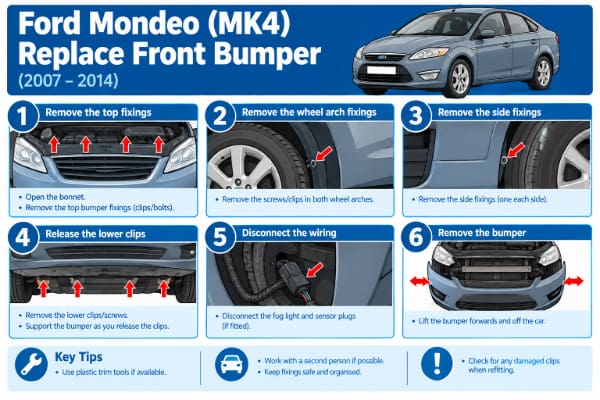
- Open the bonnet and remove the trim screws/clips along the top edge of the bumper, under the bonnet shut line.
- Remove the wheel arch liner fixings on each side that overlap the bumper's edge, and fold the liner back for access.
- Remove the under-bumper trim panel fixings, if fitted.
- Disconnect the fog light connectors and any parking sensor wiring at the bumper.
- With an assistant if possible, release the remaining side and lower clips and carefully draw the bumper forward and away from the car.
Installation procedure
- Reconnect the fog light and parking sensor wiring to the new bumper before offering it into place, while access is easiest.
- Offer the new bumper up to the car, locating the side clips and upper mounting points first.
- Refit the wheel arch liner fixings and under-bumper trim panel.
- Refit the top edge trim screws/clips under the bonnet shut line.
- Check panel gaps against the wings and bonnet are even on both sides before considering the job finished.
Final checks and road test
Check the fog lights and any parking sensors are working correctly before driving. Look along both panel gaps in good light — an uneven gap usually means a clip hasn't fully located rather than a fitting problem with the part itself. Give the bumper a firm (not forceful) push at each corner to confirm it's securely seated with no give.
Troubleshooting and tips
- Bumper won't sit flush at one corner: recheck that corner's clip and the wheel arch liner fixing nearest it — a liner not refitted correctly is a common cause.
- Fog lights not working after fitting: check the connector is pushed fully home rather than assuming a bulb failure.
- Ordered the wrong cover: double-check facelift status against your V5 build date before returning it — this is the single most common ordering mistake on this job.
Once fitted, panel gaps should sit even on both sides with no cracking, no rattles and every light and sensor working as before. Getting the facelift version right before ordering is genuinely the hardest part of this job — the fitting itself is well within reach with basic hand tools.
See also our guides to the Mondeo Mk4 headlight exchange and front suspension arm, or browse all Ford Mondeo guides and the Body Work category for more.