
How To Replace Rear Axle on Ford Focus MK3
Ford · Focus · Suspension
Ford Focus MK3 Rear Axle - What It Is and Why It Fails
This guide covers the MK3 Focus, built 2011–2018 — if you're not sure which generation you've got, the MK3 is the one that ran from the 2011 facelift-era body right through to the MK4's launch in 2018. Like other small and mid-size Fords of its generation, the MK3 uses a torsion beam rear axle — one solid pressed-steel beam running side to side, carrying both rear wheels and doing the job of springs, trailing arms and anti-roll bar in a single unit. It's simple, cheap to build, and mechanically there's very little to go wrong with it. The problem is almost never the design. It's what happens to it after fifteen British winters.
The beam sits low, close to the road, and has box-section channels that trap moisture, salt and grit thrown up off the rear wheels. Corrosion starts on the inside of those channels, invisible from underneath, long before it shows on the outer surface. By the time you can see flaking or pitting on the outside, the structural section can already be significantly thinner than it should be.
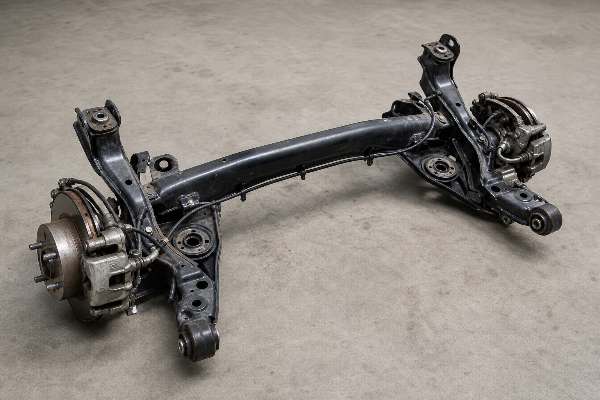
Common failure symptoms
- Clunking or knocking from the rear over bumps and speed humps
- Steering wheel sitting off-centre, or the car "dog-tracking" slightly
- Visible flaking rust or pitting on the beam or its mounting points
- Rear suspension bushes that look perished or have visible play
- An MOT advisory or fail for corrosion, security or excessive play in rear suspension
| Situation | Likely cause | Action |
|---|---|---|
| Clunking over bumps, rear end | Worn subframe bushes, or play at corroded mounting bolts | Inspect bushes and mounting points; replace the axle assembly if the beam itself is pitted or cracked |
| Steering off-centre, uneven rear tracking | Beam has shifted or is bent from corrosion loss or impact damage | Visual and tape-measure tracking check; replace the beam if it's out of shape, don't just re-align |
| Flaking rust visible on the beam or mounts | Corrosion has progressed from surface to structural | Wire-brush back and inspect depth. If it's pitted through, replace — don't patch a load-bearing beam |
| MOT advisory or fail for rear suspension | Corrosion or excessive play at the subframe mounts | Get it replaced before the advisory becomes a fail |
Reference part numbers
For the MK3 specifically (2010/2011–2018 build), the rear axle subframe/crossmember is commonly referenced under F1FZ-5035-D. Ford also used other numbers across the Focus range's full production run depending on generation, engine and market, so this is a starting point, not a guarantee — always confirm the correct part against your specific VIN with your dealer or parts supplier before ordering.
Torque figures for the beam's pivot and mounting bolts also vary by model year and engine, and Ford has revised them across the Focus's life. Rather than quote a figure here that might not match your exact car, check the torque spec against your vehicle's own workshop manual or Ford's technical data for your VIN before doing the final tightening — getting this wrong on a structural mounting bolt isn't somewhere to guess.
How To Replace the Rear Axle on a Ford Focus MK3
Safety warning: this is a heavy, structural component. Work on proper axle stands rated for the weight — never a jack alone — on level, solid ground. The beam will not stay balanced on its own once the last mounting bolt is out; support it on a trolley jack or engine leveller as you remove the final fixings. Wear eye protection when working under a corroded car, and if any bolt looks badly rusted, soak it in penetrating fluid well before you start rather than forcing it cold.
Tools and parts you'll need
- Axle stands (rated for the vehicle's weight) and a trolley jack
- Trolley jack or engine leveller to support the beam during removal/fitting
- Socket set, breaker bar, torque wrench
- Penetrating fluid for corroded fasteners
- New rear axle assembly (or beam, if bushes and hardware are being reused — check condition first)
- New mounting bolts if the originals show any corrosion or thread damage — don't reuse pitted bolts on a structural mount
- Brake line clips/fasteners as needed, and a means of supporting the rear brake lines and handbrake cable once disconnected
Removal procedure
- Loosen the rear wheel nuts, then raise and support the rear of the car securely on axle stands. Remove both rear wheels.
- Disconnect the handbrake cables from the calipers or drums, and free them from any brackets along the beam.
- Disconnect the rear brake hoses/lines where they meet the beam, and cap or plug them to stop excessive fluid loss and contamination.
- Disconnect the ABS sensor wiring at the connectors near the beam, if fitted.
- Support the beam securely with a trolley jack or leveller — it must not be able to drop once the mounts are undone.
- Remove the shock absorber lower mounting bolts at each side.
- Remove the two main pivot/mounting bolts securing the beam to the body. These are usually the most corrosion-affected fasteners on the car — apply penetrating fluid and give it time to work rather than forcing a seized bolt.
- Lower the beam carefully on the jack and walk it out from under the car.
Installation procedure
- Offer the new (or refurbished) beam up into position on the jack and loosely fit the main pivot/mounting bolts by hand.
- Reconnect the shock absorbers to the beam and loosely fit their mounting bolts.
- With the beam supported at approximate ride height, torque the main pivot bolts to the figure specified in your Focus's workshop manual for its model year and engine — this is a structural, safety-critical fixing, so don't estimate it.
- Torque the shock absorber lower mounting bolts to spec.
- Reconnect the brake lines and bleed the rear brakes to remove any air introduced during disconnection.
- Reconnect the handbrake cables and adjust as needed.
- Reconnect the ABS sensor wiring, if fitted, and check the connectors are seated and clipped correctly.
- Refit the rear wheels, lower the car, and torque the wheel nuts to spec.
Final checks and road test
Before driving, pump the brake pedal until it feels firm and check for leaks at every line and hose you disturbed. Check the handbrake holds properly on a slope. On the first drive, take it easy over bumps and listen for any clunking that wasn't there before — that usually means a bolt has been left loose rather than a fault with the new part. Get the rear tracking checked at a garage if the steering wheel isn't sitting straight afterwards.
Troubleshooting and tips
- Bolts won't budge: don't lean harder on a breaker bar and risk snapping a bolt in a hard-to-drill location — more penetrating fluid and heat (carefully, away from brake lines and fuel lines) is safer than a sheared fastener.
- Brakes feel spongy after the job: you likely need a more thorough bleed — air can hide in the line for a few pedal presses before it's fully cleared.
- Clunking persists after replacement: recheck every bolt was torqued, not just snugged — it's an easy step to rush at the end of a long job.
- Considering a used axle: only fit a used beam if you've inspected it closely for the same corrosion this guide describes — a "cheap" used part with hidden internal rust isn't a fix, it's a delay.
Once this is done, the whole rear end of your MK3 Focus should feel tight and planted again — no clunks, no wandering, and tracking as it should. It's a bigger job than most Focus repairs, but it's well within reach with axle stands, patience with corroded fasteners, and a torque wrench for the bolts that matter.
See also our guides on replacing a Ford Ka rear axle, Ford Focus front shock absorber removal and Ford Ka lower suspension arm, or browse all Ford guides and the Suspension category for more.