Your Mini Countryman Gen 1 Refuses to Wake Up: A Starter Motor Dive
There is a specific kind of dread that settles in when you turn the key—or push the start button—and your first-generation Mini Countryman (R60) responds with a single, lethargic click. Or worse, absolute silence.
If you own one of these funky, boxy SUVs produced between 2010 and 2016, you know they have personality. But that personality gets expensive when the starter throws in the towel. Let’s talk about what is actually going on under the intake manifold, why BMW changed suppliers halfway through production, and how to make sure you buy the correct unit the first time.
Not All R60 Starters Are Created Equal
Here is where things get tricky. If you try to buy a starter motor for a 2011 Mini Cooper S Countryman, you might receive a part that physically does not fit a 2014 model. Why? Because Mini shifted from Valeo to Bosch as the primary starter supplier during the 2013 model year refresh.
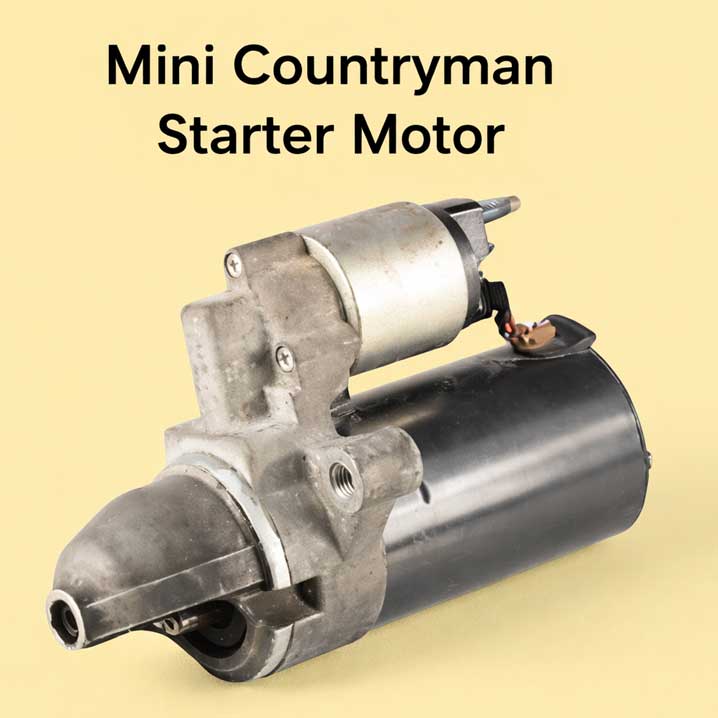
The pre-LCI (Life Cycle Impulse) cars generally use the Valeo unit, often identified by the OEM part number 12417597973. These are robust, but the solenoids are known to fail prematurely, especially if the engine has minor oil seepage that drips onto the starter over time.
Post-2013 cars, however, typically feature the Bosch unit (12417612780). It is slightly more compact and engages the flywheel with a different pitch, meaning the engine sounds noticeably perkier when it catches.
| Feature | Valeo Starter (2010–2013) | Bosch Starter (2013–2016) |
|---|---|---|
| OEM Part Number | 12417597973 | 12417612780 |
| Material | Cast aluminum body, plastic gear housing | Reinforced aluminum, fully sealed solenoid |
| Cooper/Cooper S Fitment | Interchangeable, but torque spec differs | Specific to N18 engine variants |
| Common Failure | Solenoid sticking, brush wear | Pinion gear chipping (rare) |
| Replacement Cost | Lower, but harder to find NOS | Higher, widely available |
The N14 vs. N18 Engine Context
You cannot talk about the Countryman starter without discussing the engine sitting next to it. Early 2010–2011 Cooper S models house the infamous N14 engine. These starters work harder because the N14 is notoriously difficult to hot-start due to high under-hood temperatures and carbon buildup.
If you own an N14 car and your starter sounds like it is “dragging” even with a fresh battery, it might not be the starter at all—it could be the timing chain tension or even a failing camshaft sensor tricking the DME. However, if you hear the solenoid click but the engine doesn’t spin, check the starter ground strap. BMW used a braided strap that frays, starving the circuit of current.
By 2012, the N18 engine arrived, bringing Prince engine reliability and a revised starter mounting location that offers slightly better heat shielding.
Why You Should Probably Buy the Bosch Unit
Even if you own a 2011 Countryman, I would consider retrofitting the Bosch starter. It is a direct bolt-on for most R60s, provided you swap the mounting bracket or modify it slightly. The Bosch unit handles heat soak significantly better than the Valeo, and the solenoid contacts are rated for higher amperage.
One important note: If you have a Mini Countryman Cooper (non-turbo) , your starter is actually a different animal altogether. The 1.6-liter naturally aspirated engine (N16) uses a reduced-power starter, part number 12417597971. Do not buy the Cooper S starter for a base Cooper; it engages too aggressively and can damage the flywheel ring gear over time.
The “Invisible” Failure: Thermal Soak
Here is a scenario unique to the Countryman. You drive for an hour, stop at a shop for ten minutes, come back out, and… nothing. No crank. You wait twenty minutes, and it fires right up.
This is thermal soak. The starter motor sits directly below the exhaust manifold on the R60. When you shut off a hot engine, heat rises and has nowhere to go except directly into the starter housing. Over years, this bakes the internal grease into wax and weakens the magnets in the Valeo units.
The Bosch starter mitigates this with a heat shield integrated into the solenoid casing, but it is not perfect. If you live in a warm climate, consider wrapping your new starter in a DEI heat shield blanket during installation.
The Bottom Line
The first-gen Countryman is now old enough that starters are wearing out simply due to age, not just miles. If you are dropping the subframe (or paying someone to) to access this part, do not cheap out. Buy the Bosch unit. Buy new mounting bolts—they are torque-to-yield and stretch. And while you are in there, check the oil pressure switch, because it leaks directly onto the starter terminal.
Your Countryman is weird, wonderful, and worth keeping on the road. It just needs a little help waking up in the morning.
Replacing the Starter Motor in a First-Gen Mini Countryman
The text message arrives on a Tuesday. It is your neighbor, or your cousin, or maybe just you looking in the mirror: “My Countryman won’t start. Just clicks. Tow truck or DIY?”
I am here to tell you—tow truck for the diagnosis, but DIY for the repair. Replacing the starter motor on a first-generation (R60) Mini Countryman looks like an engine-out affair if you squint at the service manual. It isn’t. You can do this in a driveway with jack stands, a healthy vocabulary of expletives, and one very specific swivel socket.
But you need a game plan. The R60 does not forgive guesswork. Let’s walk through it.
Step Zero: Are You Sure It’s the Starter?
Before you drain the coolant or remove the intake manifold, perform the $0 diagnostic. The Gen 1 Countryman suffers from three common no-crank conditions that mimic starter failure.
If you turn the key and get silence? Check the ground strap from the engine block to the chassis. It is located near the passenger side engine mount. If it looks like a frayed rat’s nest, the starter isn’t receiving return current. A $15 ground strap from ECS Tuning has saved hundreds of R60s from unnecessary starter swaps.
If you get a single click? That is usually the solenoid engaging but the internal contacts being carbon-crusted. That is the starter.
If you get rapid clicking? Dead battery or corroded terminal. Don’t be that person who replaces a starter because the interior light was left on overnight. I have been that person. It is humbling.
The Great Starter Debate: Valeo vs. Bosch
Here is where the R60 throws a curveball. Between 2010 and 2016, Mini used two completely different starter suppliers, and they are not interchangeable without swapping the mounting bracket.
If your Countryman was built before March 2013, it left Oxford with a Valeo starter. The OEM number is 12417597973. It is a fine unit, but the solenoid is exposed to heat directly from the exhaust manifold. Over time, the grease turns to wax and the internal plunger sticks.
After March 2013, Mini switched to Bosch, part number 12417612780. Bosch redesigned the nose cone and relocated the solenoid connector. More importantly, they added a partial heat shield to the body.
The Pro Move: Even if you own a 2011, buy the Bosch starter. You will also need the Bosch-specific mounting bracket (part 12417612779) because the bolt pattern is rotated about 15 degrees. The Bosch unit handles thermal soak—that hot-start failure where the car refuses to crank after a short stop—significantly better.
| Component | Valeo Setup (2010-2013) | Bosch Retrofit (All Years) |
|---|---|---|
| Starter Part # | 12417597973 | 12417612780 |
| Mounting Bracket | Integrated to starter | Separate bracket (12417612779) |
| Heat Protection | None | Partial shield on solenoid |
| Bolt Torque (Mounting) | 20 Nm | 20 Nm (new bolts required) |
| B+ Terminal Nut | 13mm, 12 Nm | 12mm, 12 Nm |
| Pros | Direct swap for early cars | Better hot-start, widely available |
| Cons | Heat soak prone | Requires bracket swap |
Tools and Materials: The Non-Negotiables
You cannot do this job with a basic Craftsman set. Accept this now.
Required:
- ⅜-inch drive ratchet and extensions (6-inch and 12-inch)
- Swivel socket, 13mm and 12mm – You will not reach the upper intake bolt without this. I recommend the GearWrench pass-through set or a quality universal joint socket.
- E8 and E10 Torx external sockets (for the intake manifold brackets)
- T30 Torx bit (for the engine wiring harness tray)
- New starter bolts – These are torque-to-yield. Reusing them risks the starter backing off mid-drive. BMW part 07129905552.
- Jack and jack stands
- Trim removal tools (the plastic clips on the engine cover will break)
Optional but Smart:
- Heat shield blanket (DEI Titanium)
- Dielectric grease (for the solenoid connector)
- New intake manifold gaskets – You have to pull the manifold. They are brittle. Just replace them. Part 11617560538.
The Process: What the Manual Doesn’t Tell You
Every forum guide says “remove the intake manifold.” Technically true. But if you lift the engine slightly by the jack point under the oil pan, you can sneak the starter out the bottom without fully removing the manifold from the car. This saves two hours.
1. Access and Safety
Disconnect the battery negative terminal. Wait five minutes. The R60 runs a BSD (Bit Serial Data) interface to the alternator, and you can trip sensor faults if you disconnect things while the system is still awake.
Remove the engine cover (four grommets—pull straight up). Remove the cowl trim if you have large hands, but it is not strictly necessary.
2. Intake Manifold Strategy
You do not need to disconnect the coolant hoses from the throttle body. You do need to remove the eight E8 Torx bolts holding the manifold to the cylinder head. Label them. They are different lengths.
Unclip the wiring harness from the tray above the manifold. Move the harness toward the passenger side. Do not force the MAP sensor connector; press the red tab inward first.
Now, here is the shortcut. Instead of removing the manifold entirely, unbolt it and pull it forward about four inches. Place a block of wood between the manifold and the engine bay strut tower. This creates just enough space to access the starter without disconnecting every vacuum line.
3. The Starter Itself
Look down behind the intake runner for cylinder three. There it is—a cylindrical black component covered in grime, tucked against the transmission bellhousing.
Electrical First:
Remove the plastic cap on the large B+ terminal. Use a 12mm (Bosch) or 13mm (Valeo) deep socket to remove the nut. Slide the red wire off. Tape it to the wiring harness so it doesn’t disappear into the abyss.
Unclip the small solenoid connector. On Valeo units, this is a push-pull tab. On Bosch, it is a squeeze-and-pull. If the plastic is brittle, use a trim tool, not your fingernails.
Mounting Bolts:
There are two bolts holding the starter to the bellhousing. The top bolt is the enemy.
You cannot see it. You can barely feel it. This is where the swivel socket earns its keep. Attach the 13mm swivel socket to a 12-inch extension, then to the ratchet. Approach from the driver side, reaching over the top of the transmission.
The bolt will come out in stages. Do not drop it. There is a small ledge beneath the starter where bolts go to die. Magnets on extensions are your friend here.
4. Extraction and Installation
The Valeo starter slides out toward the radiator, then up. The Bosch unit, due to its separate bracket, slides out toward the passenger side.
Before installing the new starter, bench-test it. Connect jumper cables directly to the unit and touch a wire to the solenoid terminal. The gear should shoot out and spin. If it doesn’t, your “new” part is defective. This happens more often than parts stores admit.
Transfer the heat shield if your old starter had one. Apply a thin film of anti-seize to the mounting bolt threads—not the shaft, just the threads.
Torque the bolts to 20 Nm in a crossing pattern. Reconnect the electrical terminals. The large B+ nut gets 12 Nm. Snug is sufficient; overtightening cracks the plastic housing.
The “While You Are In There” Opportunity
You have the intake manifold loose. The starter is replaced. Do not bolt everything back together yet.
Oil Pressure Switch: This is located directly above the starter on the N18 engine. If it leaks—and they all eventually leak—oil drips onto the starter terminal, causing corrosion and voltage drop. Replace it now. Part 12617811601. It is a 27mm socket, accessible only with the starter removed.
Crankcase Breather Hose: The plastic elbow at the rear of the intake manifold becomes brittle. If it snaps during reassembly, the car will run lean and throw a check engine light. Part 13717597527. Replace it preemptively.
Ground Strap: Look at the braided strap from the engine to the body. If it is green or frayed, replace it. Part 12417521017.
Reassembly and First Start
Reinstall the intake manifold with new gaskets. Torque the E8 bolts to 9 Nm—this is inch-pounds territory, not foot-pounds. Over-tightening cracks the plastic manifold.
Reconnect the battery. Before fully assembling the engine cover, attempt to start the car.
It should crank instantly. If it cranks but doesn’t start, you may have bumped the crankshaft position sensor connector near the oil filter housing. Check that.
Let the engine reach operating temperature. Cycle the ignition three times to reset any low-voltage shadow codes. Take it for a drive that includes at least one ten-minute cooldown period to test for hot-start performance.
The Verdict: Was It Worth It?
A dealership charges between four and six labor hours for this job, typically $900 to $1,200. The parts, even with the Bosch upgrade and fresh gaskets, cost under $300.
But the real victory isn’t the money. It is the knowledge that your quirky, expensive-to-maintain British-under-German-management SUV is not a mystery box. It is a collection of bolts and sensors, and you just defeated the worst one.
The first-generation Countryman is now old enough that starters are failing not from miles, but from time. The rubber hardens. The grease solidifies. The copper contacts pit and corrode. But unlike the sealed modules in modern cars, this starter is serviceable. It is accessible. It is your car.
And when you turn the key tomorrow morning and the engine snaps to life immediately, you will smile. Not because the Countryman is reliable—it never will be, entirely—but because you are.


