Ford Ka MK2 Lower Suspension Arm: The Complete Owner’s Guide To
The Ka is a brilliantly simple little car, and its front suspension follows the same logic. It uses a fairly conventional MacPherson strut setup, and sitting at the heart of that front corner is a component that most owners never give a second thought to — right up until it starts telling them otherwise. The lower suspension arm (also called a wishbone or control arm) is a triangular steel link that connects the front hub carrier to the car’s subframe.
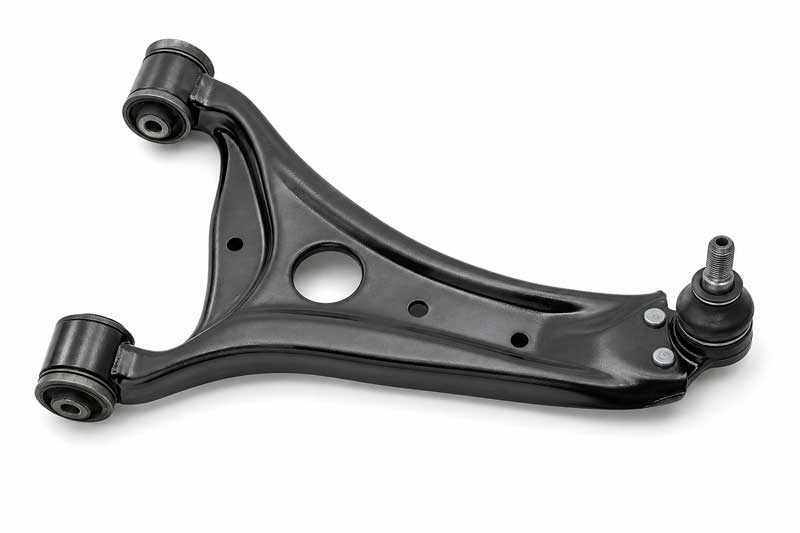
One end bolts to the subframe in two places; the other end plugs into the hub via a ball joint. That arrangement gives the wheel a controlled arc of movement as the suspension travels up and down, while also stopping the wheel from moving sideways or rearwards under load. Without it doing its job properly, your steering gets vague, your tyres wear unevenly, and — on a bad day — the whole front corner can become genuinely unpredictable.
The good news for Ka owners is that there’s no electronic complication here whatsoever. Unlike some modern vehicles where adaptive damping or air suspension management requires ECU interaction after component replacement, the Mk2 Ka’s front suspension is entirely passive and mechanical. The arm itself is a cast or pressed steel unit with a ball joint at the outboard end and two rubber-bushed mounting points where it connects to the subframe. No sensors, no coding, no calibration required after fitting — which makes this very much a DIY-friendly job.
When Things Start Going Wrong
The signs of a failing wishbone often creep up gradually, which is why so many cars end up with badly worn units that have been quietly deteriorating for months. The first thing most drivers notice is a knocking or clunking sound from the front of the car when going over speed bumps, potholes, or when pulling away from a standstill. That noise typically comes from either the front or rear subframe bush inside the arm, which are rubber mounts that harden, crack, and eventually collapse with age. The Ka is well known for this — particularly the rear bush, which takes a lot of the braking and acceleration forces and can deteriorate even on cars with relatively modest mileage.
Beyond the noise, you might notice the car pulling slightly to one side, a wandering, imprecise feeling through the steering wheel, or the front end feeling “floaty” over uneven surfaces. Tyre wear is another tell — if the inner or outer edge of a front tyre is wearing faster than the rest, that’s geometry going out of tolerance, and worn wishbone bushes are a common cause. A failed or loose ball joint at the outboard end can introduce a more dramatic clunking sensation and, in serious cases, a perceptible knock when turning the steering wheel lock-to-lock. Any MOT tester will check for movement in the ball joint by levering the arm, so if yours has been flagged on a recent test, don’t sit on it.
Generation Variants and Part Compatibility
The Mk2 Ka (internal code RU8) ran from 2008 to 2016 in the UK market and shares its platform with the Fiat 500 of the same era — a useful fact because Fiat 500 wishbones are dimensionally identical and often available at similar prices. The arm itself remained essentially unchanged throughout the production run; there are no mid-cycle revisions to the geometry or mounting points that you need to worry about when buying replacement parts. What does vary is the fitment between nearside (left-hand, driver’s side) and offside (right-hand, passenger’s side) — the two arms are mirrored and not interchangeable, so always double-check you’re ordering the correct side.
| Generation | Model Code | Common Spec | Typical Use Case | Est. Replacement Cost (GBP per arm) |
|---|---|---|---|---|
| Ford Ka Mk1 | CCQ (1996–2008) | Separate ball joint, older bush design | High-mileage budget runabout | £15–£35 |
| Ford Ka Mk2 | RU8 (2008–2016) | Integrated ball joint, cast/pressed steel | City car, light daily use | £25–£55 |
| Ford Ka+ (Mk3) | UK/FK (2016–2023) | Sheet steel, separate subframe design | Modern city/family use | £25–£55 |
Part Numbers, OEM References, and What to Look For
The OEM numbers for the Mk2 Ka wishbone (RU8 platform, 2008–2016) include Fiat-sourced references 51857022 (nearside/left) and 51857021 (offside/right), as well as 51860383 — cross-referencing any of these will usually return the correct fitment. When shopping aftermarket, the main brands worth considering are Febi Bilstein (part numbers 34759 left, 34760 right), SWAG (70 93 4759 / 70 93 4760), Delphi (TC2184), and RIDEX (273C0520 / 273C0413). Prices on the aftermarket typically run from around £25 for no-name budget units up to around £55–£65 for quality brands like Febi or FAG. MOOG and Meyle also make solid options if you want something built to last.
One thing to be clear on when buying: most aftermarket arms for this car come as a complete assembly including the ball joint and both rubber bushes already pressed in. That’s actually ideal — there’s no point saving a few quid by replacing just the bush if the ball joint is also showing wear, and separating the ball joint taper from a worn arm is often more hassle than it’s worth. Avoid suspiciously cheap no-brand units from unknown sellers; on a safety-critical component this size, a £12 arm from an unverified source isn’t worth the risk.
The One Thing Most People Miss
Here’s the red flag that catches a lot of home mechanics off guard: the subframe mounting bolts are torque-to-yield fasteners, and Ford specifies new ones on reassembly. Many guides skip over this entirely, but these bolts stretch slightly as they’re tightened and are designed for single use. Reusing the old ones risks either under-torquing (leaving the arm loose) or, worse, the bolt fatiguing and failing in service. A set of new subframe bolts costs next to nothing from a Ford dealer or a specialist, and it’s the sort of thing that separates a proper job from one that comes back to bite you six months later.
Part 2: How to Remove and Replace the Ford Ka Mk2 Lower Suspension Arm
This guide is written specifically for the Ford Ka Mk2 (RU8 platform, 2008–2016), covering all engine variants including the 1.2 and 1.3 petrol units. Because the Ka RU8 shares its front subframe and suspension geometry with the Fiat 500 of the same generation, this procedure applies equally well to that car — the architecture is identical. There’s no ABS geometry correction, no adaptive suspension, and no ECU coding involved on any version of this car, which makes it a genuinely manageable DIY job if you’re comfortable working underneath a vehicle.
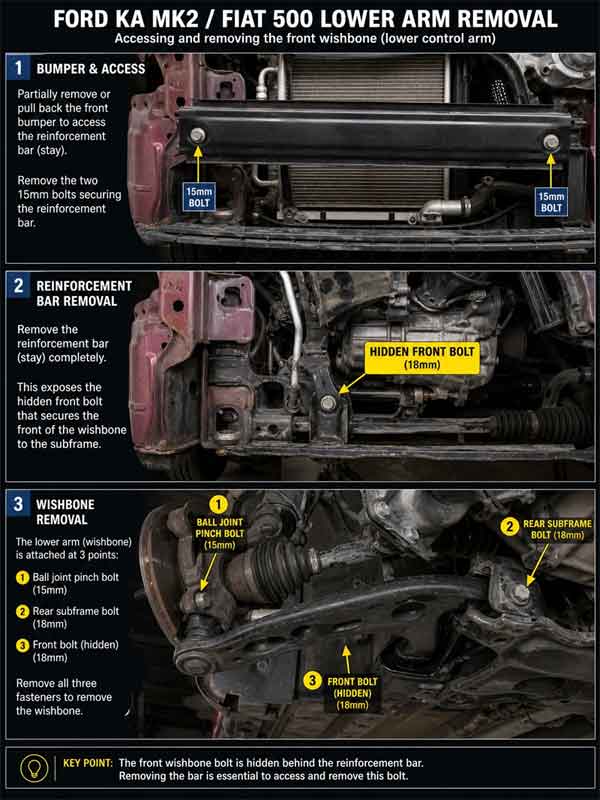
The Hidden Bolt: The One Thing Most Guides Don’t Tell You
Before you crack on, there’s one gotcha that trips up a lot of people on this job: the front subframe mounting bolt for the wishbone sits inside a recess in the subframe itself, partially hidden behind the front bumper assembly. On some guides you’ll see it described as a straightforward undo-and-remove, but on a car that’s seen a few winters — which, let’s face it, most UK Kas have — that bolt can be heavily corroded and near-impossible to reach without first removing the inner wheel arch liner and, in some cases, pulling the front bumper back to access the subframe support brackets. Don’t assume you can do this job with the car on the drive and a trolley jack — a proper axle stand setup and decent access to the underside is non-negotiable.
Phase 1: Removal
- Chock the rear wheels, put the car in gear (or P if automatic), and loosen the front wheel bolts with a 19mm socket while the car is still on the ground. Breaking these loose before you lift the car saves a lot of frustration.
- Raise the front of the car with a trolley jack under the jacking point and support it securely on axle stands under the sill. Never work under a car supported only by a trolley jack. Remove the wheel once the car is safely supported.
- Spray everything liberally with penetrating fluid — the ball joint nut, both subframe mounting bolts, and any visible threads. If you’re in no rush, do this the evening before and let it soak overnight. This step is worth its weight in gold on a car of this age.
- Remove the inner wheel arch liner (the plastic splash guard) by undoing the plastic push-clips and any screws at the front edge — usually a mix of T20/T25 Torx screws. This gives you much better access to the front subframe bolt.
- Locate the ball joint pinch bolt where the wishbone’s outboard ball joint meets the hub carrier (steering knuckle). This is typically a 13mm spanner on the nut and a 15mm socket on the bolt head. Undo and remove this bolt completely. Don’t be tempted to just slacken it — it needs to come out.
- Separate the ball joint taper from the hub carrier. This is usually the most stubborn part of the job. Resist the temptation to hit the hub carrier directly with a hammer — you risk damaging it. Instead, use a flat chisel or a proper ball joint separator wedged into the pinch slot on the hub, give it a sharp knock with a hammer, and the taper will pop free. Alternatively, pry down firmly on the arm with a long lever bar whilst someone pushes the hub outward — it often releases with a satisfying clunk.
- Undo the front subframe mounting bolt — this is the one that sits inside the subframe recess. Use a 15mm socket on a long extension bar, ideally with a breaker bar or impact wrench if corrosion is bad. If you had to pull the bumper back for access, now you’ll see why the prep work mattered.
- Undo the rear subframe mounting bolt, which connects the back of the arm to the subframe. This is typically a 13mm socket. This one is usually more accessible but equally prone to rust on older cars.
- Remove both mounting bolts and pull the arm downward and rearward to release it from the subframe. It should drop away cleanly. If it’s stiff, a rubber mallet on the arm body will encourage it without damaging anything.
- Inspect the subframe mounting holes for corrosion or thread damage before fitting the new arm. A wire brush and some WD-40 will clean them up nicely.
Torque Specifications
Use new bolts on reassembly. These figures are for the Ka Mk2 (RU8) front lower arm:
| Component | Fastener Size | Torque (Nm) |
|---|---|---|
| Ball joint pinch bolt (hub carrier) | 13mm / 15mm | 48 Nm |
| Front subframe mounting bolt | 15mm | 100 Nm |
| Rear subframe mounting bolt | 13mm | 85 Nm |
| Wheel bolts | 19mm | 110 Nm |
Note: Always use a calibrated torque wrench for the subframe bolts. These carry significant load and must be tightened to spec — not by feel.
Phase 2: Installation
Installation is broadly the reverse of removal, but there are a couple of important points that aren’t simply “do it backwards.”
First, do not fully tighten the subframe bolts with the suspension hanging free. Fit the arm loosely into the subframe, locate the ball joint into the hub carrier, and get the pinch bolt in finger-tight. Then lower the car off the axle stands so the suspension settles at ride height with the weight of the car on it — or if you have a jack, raise the hub with it to simulate laden ride height. Only at that point should you torque the subframe bolts to their final specification. If you torque them with the suspension drooping, the rubber bushes will be pre-loaded in a twisted position and will wear out prematurely. This is the step most people skip, and it’s why some DIY wishbone jobs feel fine at first but start clunking again within a year.
Second, use new subframe mounting bolts — as covered in Part 1, these are torque-to-yield fasteners and should not be reused. When fitting the new arm, use a rubber mallet to gently persuade the mounting bushes into position if they’re slightly stiff; don’t lever or force them in a way that could nick the rubber.
When reconnecting the ball joint to the hub carrier, make sure the taper seats fully before fitting the pinch bolt. If the taper spins in the bore, try pressing down on the arm to seat it while tightening. Fit a new pinch bolt if the old one shows any stretching or thread damage.
Finally, get the tracking (wheel alignment) checked after this job. Replacing a wishbone changes the suspension geometry, and even a small misalignment will cause rapid tyre wear. Most tyre shops and garages will do a basic front-axle track check for £20–£30, and it’s money very well spent.
Is It Worth Doing Yourself?
In short: yes, absolutely — if you’re reasonably handy and have access to axle stands and a torque wrench. Here’s what the numbers look like:
| DIY | Garage | |
|---|---|---|
| Parts (one arm, quality brand) | £30–£55 | £30–£55 |
| Labour | £0 | £60–£100 |
| Wheel alignment check | £20–£30 | Usually included |
| Total estimated cost | £50–£85 | £120–£180 |
The job takes most competent home mechanics around 1.5–2 hours per side on a first attempt, and probably half that if you’ve done it before. The only real risk is if the front subframe bolt is completely seized — at that point you either need a quality impact wrench, a lot of patience with heat, or you’re into garage territory. That said, good penetrating oil the night before solves this more often than not.
Difficulty Rating
3 out of 5 spanners — straightforward in principle, but corroded bolts and tight access to the front subframe mounting point can turn a 90-minute job into a full afternoon. Worth doing yourself if you’re comfortable under a car and have the right tools.